What is the exposure triangle?
The Exposure Triangle is one of the best-known concepts to “explain” how photography works. Unfortunately it’s also the biggest source of confusion in photography.
On this website, I will stop that confusion and teach photography so that you actually understand.
Exposure in Photography
What Does Exposure Mean?
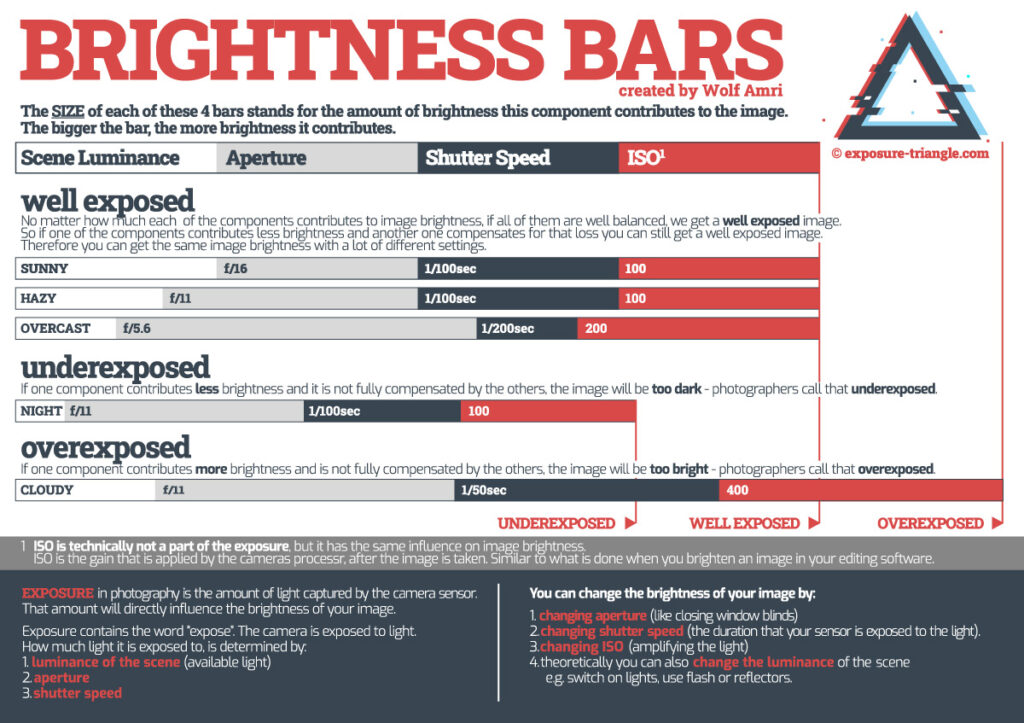
When photographers talk about exposure, they actually mean image brightness, which is not entirely correct and causes confusion. An image can be:

Under Exposed
When the image is too dark.

Well Exposed
When the image brightness is perfect.

Over Exposed
When the image is too bright.
But What is Exposure Really?
Exposure contains the word expose.
So to understand it, we have to ask ourselves two questions:
1. What is Exposed?
That’s the sensor of our camera, or for film-photographers, the film.

2. What is it Exposed to?
To the scene you want to photograph. So basically to more or less light, because the scene can be brighter or darker.

So light is the source of it all. Photography is Greek. Some people say it means painting with light, but it really means the light paints so the light is the artist and the source of our images.
Let me repeat that, because it is so vital to understand exposure:
The three settings of the Exposure Triangle are just a reaction to the amount of light
in the scene you want to photograph"

What are the Components of Exposure?
Before I explain the components of exposure. Please keep in mind. Every single one of the components has an effect on image brightness. Changing one of them will make the image brighter – but only, if you don’t compensate with another one. If you are not in manual exposure mode, your camera will automatically compensate with another setting if you change one!
1. The Brightness of the Scene
Since you learned that exposure is all about light, the most important component of exposure is so-called scene luminance, which is the correct term for scene brightness. Scene luminance (scene brightness) is simply the single most important ingredient of image brightness. Once you keep that in your memory, the Exposure Triangle will be much easier to understand.
Quite logically, the brighter your scene is, the brighter the image will get, if you don’t change any camera settings.
For us humans that is sometimes hard to understand because our brain tries to provide our mind with constant light levels. In reality, the light levels change dramatically.
Consider you are photographing your kids playing basketball in a gym. You’d think it is considerably bright in there, but the truth is: the light level in a gym is usually 250 times darker than outdoors. That is massive!!! We don’t realize that because our brain tricks us. Our cameras on the other hand can only use what is really there to expose our images, so in photography these varying light levels force us to make compromises.
Summary: brighter scene – brighter image
2. Aperture
To get into the camera, the light of the scene we want to photograph, passes through the lens. In that lens is a hole, called aperture. The aperture is variable in size, giving us the option to block some of the light and therefore reduce brightness of the image.
Compare the aperture to a window with blinds. The more you close the blinds, the more light will be blocked and the darker the room will get. Same with the light that enters the camera.
Summary: bigger opening – brighter image
3. Shutter Speed (Exposure Time)
After the light passes the aperture, it almost reached it’s destination, the camera sensor. Before it can start exposing the sensor, it is blocked by a “door” (shutter). Just like with a real door, if you open it, you will let light in. To open that door in our camera, we have to press the shutter button.
The amount of time the shutter is opened to expose the sensor to the light in the scene is called shutter speed. But the correct term would be exposure time. Why exposure time is the correct phrase and why photography is much easier to understand, if you use that term instead, will be explained on a dedicated page, when you follow the link below.
Summary: longer exposure time – brighter image
With the closing of the shutter, exposure has ended!!!
Quite logically, if you close the door (remember, that’s what the shutter is), the light is blocked again. And if the sensor is not exposed to light any more, exposure has ended too.
Do you Miss ISO?
After having another look at the exposure triangle above, you might be surprised that I didn’t list ISO under the components of exposure.
ISO for many people is some kind of a mythical figure – the wizard of the camera settings.
ISO is the Gain
The truth is, it’s much easier than that. ISO is the gain that is applied to the amount of light your camera sensor has “recorded”. And being exactly that, the gain, it has nothing to do with exposure. It is applied by the cameras processor long after the shutter has closed.
Nevertheless, the gain has an influence on image brightness
Summary: higher gain (ISO) – brighter image
New Revolutionary & Free Youtube Photography Course Coming Soon
If this page helped you learn, I promise my new photography course videos will help you even more. It will be packed with exercises and new ways of teaching photography – faster, easier, more fun.
Sign up to my mailing list to be the first to get notified when it goes live on my YouTube channel.
Why is the Exposure Triangle Confusing?
- the Exposure Triangle doesn't list scene luminance, which is the most important part of exposure and image brightness.
- the Exposure Triangle lists ISO as part of the exposure. But ISO is the gain, that has nothing to do with the source of exposure (light)
That leads to massive confusion among beginner photographers, who think the camera settings are a magic mix, while in reality they are just a reaction to the amount of light we have available. When you understand that photography is all about light, everything else will be much easier to understand.
Now let me recommend learning how each camera setting affects your images. In the end I will introduce you to a cheat sheet that is a much better model to explain image brightness and will help you understand exposure and photography once and for all.
Exposure Triangle FAQ
Here is a list about the most frequently asked questions regarding the Exposure Triangle.
If you have a question, feel free to ask below and I will add it to the list.
You learned above that the single most important source of image brightness is scene lumincance. According to that, the camera settings depend on how much light you have available and what you are trying to photograph. If you continue this “course”, you will find out that for example shutter speed depends on how fast the subject you are photographing is moving. Don’t worry, it all sounds much more complicated than it is, continuing step by step on this page, will help you understand, which is much better than learning anything by heart.
Trust me: you don’t want an exposure triangle cheat sheet. What I will rather give you is a cheat sheet that will make you understand photography. Let me try to convince you to keep on reading the easy to understand lessons here on the page first though because understanding the components of exposure and what they do, will help you much better.
Ready? Here is the link to the next “lesson”: Scene Luminance
Unfortunately people hardly ever question what they have been taught by others. But there are numerous great photography teachers out there teaching photography without ever mentioning the exposure triangle.
The exposure triangle lists ISO. ISO is an electronic gain and has nothing to do with light. It’s almost the same as adding image editing to the exposure triangle.
On the other hand the triangle doesn’t list scene luminance despite it being the most important part of exposure.
Please comment below. I will constantly update this section with new questions.
SPREAD THE WORD
Did you ever hear that the exposure triangle is wrong? No? What about letting your friends know that this site contains interesting info?
Interesting and Correct Exposure Triangle Links
- Exposure explained on Wikipedia
- “Can we just kill the exposure triangle?” on fstoppers.com
Wolf, you have certainly made things much easier to understand. I found the exposure triangle very confusing. I’ll be taking your course for sure.
Thanks a lot, Dianna! I really appreciate your feedback! More to come, promised 😉
Thank you for spending so much of your time helping us with all the fundamentals of photography. Your tutorials, the group you have on Facebook, and taking the time to answer all our questions make learning and understanding much more straightforward. In addition, you have such an excellent way of bringing people to feel inspired by offering us encouragement and recommendations. With all these influences from you, there will soon be more people enjoying the pleasures of photography even if some are only doing it as a hobby or for self-satisfaction.
Thank you so much, Jo! I really appreciate your encouragement. It’s so much fun to see people improving.
You might not see me posting or commenting a lot but I’ve been silently learning everything I can on your YouTube channel because they’re so much easier to understand.
Thank you so much, Nicholas. I do see your comments and you probably have no idea how much I appreciate them. Thanks for watching and taking the time to check out this page 🤗.
Thank you so much Wolf. This is such an informative and helpful resource to have at our fingertips. You have the ability to make everything easy to understand. One day I hope I won’t have to think about it all and it will come more naturally!
Thank you, Angela! 🤣 I don’t think I have that ability. I just sit there for hours and sometimes days to think about how I can make things easier – it’s kind of a hobby 🤣. You will get there. It’s a question of doing it once you learned it. We all go through that 😉.
Thank you for this fantastic website. Everything is explained very understandable and with great attention to detail. It makes learning easy and fun.
The graphics and photos are exceptional and I can easily visualize all the explanations with them.
Everything has arrived in my head – theoretically. Now I have to implement it practically with my hands. And I hope one day I will know it by heart.
Thank you so much for your feedback, Evelyn – great to hear the site is helpful. Now I need to find a way for people to post their pics 😉.
Yes indeed. But I’m sure you will. Things only seem impossible until they are done. 🙂
Thanks, Evelyn. Let’s see if I can prove you right 😁.
Finally a professional I can understand, too many people who are professional photographers with photography websites that have forgotten what it was like to be a beginner, Wolf breaks down the information and advice that a novice can say “so that’s how it is done, the last guy made it sound like rocket science “.
I have contacted Wolf before with questions, I was amazed to get an instant reply, I have found out, that doesn’t happen with a lot of people I have contacted in the past.
I have asked a lot of questions, (some stupid ones as well), Wolf has taken the time and trouble to explain everything. He is the now the person I would contact first to solve any photography problems.
Well done Wolf, keep the videos coming.
Regards Charlie
Thanks so much for your feedback, Charlie. Great to know that I could help ;).
Hello Wolf
Not sure if this is the place to ask this question, Based on what I have picked up from you so far, if I use an ND filter, say ND32, my original set up was shutter speed was 1/100, now with the filter (ND32) my exposure time would now be 1/3.
Now if I was to include a polariser filter would I be correct that this would be an additional stop, so I would require a exposure time of 0.5. (Trying to get my head around this).
As you can gather not an expert at this, another question which may sound a bit stupid, does it make any difference if you put on a polariser lens first then the ND filter or reverse.
Apologies again if I have put the question in the wrong place. Thanks for the opportunity to learn.
Regards Charlie
Hi Charlie,
ND32 is a 5 stop filter. That would get you from 1/100sec to 0.6sec (I’ll include the full list of shutter speeds in one line in the cheat sheet for ND filters I’m creating to make it easier – jumping lines as in the current 3steps1Stop1EV cheat sheet can be a bit confusing).
A polarizer is usually around 1-1.5 stops (depending on its setting). So that would get you to roughly 1.6sec.
BUT: variable ND filters are already two stacked polarizer filters. I just tried on mine if that has any negative effect, but it didn’t. But just make sure to test that out before doing an important shoot.
When stacking screw-on filters you have to expect vignetting in the corners of each image ;).
Hi again! Just wanted to let you know that I created an ND filter chart and a dedicated page for ND filters.
You can find the page here: https://exposure-triangle.com/nd-filters-explained/ and the chart in the download section.
Cheers,
Wolf
Thanks Wolf, it’s all beginning to make a bit more sense, taking your advice over the last few days, put it all together and the photos look not too bad at all, thanks for the instruction, will be looking forward to your sheet regarding the ND filters, the information on the exposure triangle really helped to understand how it all works, beginning to enjoy photography a lot more when things come together and work. Cheers Wolf
That’s awesome, Charlie. If you haven’t yet looked at the other sections on this page (scene luminance, aperture, shutter speed, ISO, etc.), try it. I see you like to understand photography, which is exactly my goal with this website. Take your time and first read all the “in a nutshell” sections and then go back to the start and read the advanced knowledge. It’s really not all that much to read all together, but it helps so much when using the stuff when taking pics.
I’ve watched your Miops Slider+ numerous times and I ended up buying one. One thing I can’t find is your Focus Stacking cheat sheet on your site, am I missing it?
Hi Chris,
also to you sorry for the delay. I need to work on my notification settings.
I hope you enjoy the Slider+. It’s a pretty awesome tool!
Here is the link to the cheat sheet, I just updated it.
https://exposure-triangle.com/pdf/focusStackingCheatSheet.pdf
Hello, where can I find a link to focus stacking Cheat Sheet ?
THX
Hi Ivan!
Sorry, seems like I missed a few replies. I need to work on my settings.
Here is the link to the cheat sheet, I just updated it.
https://exposure-triangle.com/pdf/focusStackingCheatSheet.pdf
Hello,
how do I make sure that Slider+ charging is finished. well thank you
That’s a good question. Mine is fully charged at the moment, so I cannot try.
You could check the battery status in the app.
Perhaps drop their support a note, maybe the LED tells you something in this regard.
Hello, I have the latest Miops mobile application, but I did not find such an option there. I will try support.
Nice day
Hey Ivan, I replied to your other question.
I am sending another one, much more serious. With this problem, I’m already starting to think about returning the console. What is it about? When I set the position “A” and later “B”, I move the capsule using the controller in the Miops Mobile APP. It happens regularly that I move to the right-ok it goes to the right. I change the direction and move the controller to the left – problem. The capsule keeps going to the right. I repeat the left direction – the capsule still goes to the right. After several attempts to change direction, the capsule wises up and changes direction. This is very frustrating, because slowly I don’t even know where I am anymore. The second case of bad control is when I turn right at the beginning and the capsule starts to move to the left. I have no way to convince her that it is exactly the opposite. Another case – the control motor moves exactly the other way around. He simply switches sides and on command right-goes left and vice versa. There are many right-left combinations, but the result is that the engine control itself determines where it will go. After several attempts, it wises up and reacts as it should. I don’t know if it’s the control or the motor, but once again someone managed to develop a little thing for more than €500 that drives you crazy. I sent the videos to support, I’m waiting for their response. It is not a product for €20. Have you encountered it? Sorry Google translate.
Hi Ivan,
sorry that you are having issues with the slider. No, I didn’t have these things happening to me. It worked pretty flawlessly. The only issue I had was the one I mentioned that when setting point A or B, it would go to the last saved point. That was a bit annoying. I haven’t installed a firmware update yet. Maybe they took care of it.
Thank you and at the same time I will ask: When is the miops Slider+ fully charged?
Nice day
Well thank you. And what is the procedure for installing the firmware. via computer and USB port for capsules? And where can I find new firmware, because I couldn’t find anything on miops.com.
Without doubt Wolf is an amazing photography coach, Until he pointed me in the right direction I couldn’t take a single photo I was happy with. I’ve still got a long way to go though. Great website!! Thanks
Thank you so much, Mike! Great to see you here! I hope you’re doing good?
I really enjoy your content and watching your You Tube videos. I am very interested in focus stacking. I have come up with very similar step sizes as you have. I did find that apertures must be watched due to the risk of diffraction. I have had to open up my apertures more since the apparent apertures change as the magnification increases. I found tables for effective apertures at different magnifications.
Have you run into this situation?
Hi Henrik!
Thank you for your feedback. Yes, the aperture setting is a balancing act when doing focus stacking. On the one hand, you want to avoid diffraction, but on the other hand, there is that effect that I described in the video, that at one point, there is no clean background that the software could use to stitch the image accordingly. Particularly if your subject has lots of overlapping parts that then would lead to halos. In my experience there is no clear rule as to what works in which situation. But the more overlapping, the higher f-number you’ll need to avoid halos.
Hi Wolf, I really don’t know how to express my feelings for the massive work you are sharing via your YT channel and website. Anyway, let me say “Thank you Wolf ” – – I often visit your channel when I want to clarify some thing or when I lost in photography use it more as a “refresher break”. Today, happened to visit your website – that is a different place for photography, I have noticed you put a massive energy and creativity in your videos etc., and all that work has so much use for the viewers I hope.
For instances, in my case, – – I watch your channel from Sri Lanka, photography is not an easy subject here, equipment are expensive, resources are not abundant. It took 4 years for me to collect money and buy an entry level camera kit. It is even difficult to learn photography here with an advanced technology. So, in this situation, your channel and this website is a school of photography for me, I see many resources on the internet, for me, your work is specific and practical, and educative. In number of your videos, I found “solutions” for some of my problems, especially your video on green-screen is a huge lesson for me. Now, I am working to set up green screen. So, at the end, please accept my heartfelt gratitude for all your energy, creativity, and sharing your work with people around the world!
Hi Rane,
thank you so much for taking the time to write such a nice feedback. I really really appreciate that!
Your words keep me motivated. I haven’t uploaded in quite a while because I’m working on new courses. I feel I can do much better after the years. I have learned to understand what people have issues with and which answers they rather understand. All that flows into the new course.
I totally understand that this world is highly unfair. Why do for example Adobe Subscriptions cost virtually the same in every country – no matter how much people in these countries earn. That’s not OK and I try to fight that with helping with the small possibility I have.
Cheers my friend, and keep shooting!!!