How to photograph the Perseides meteor shower

Don't Miss the Perseids - Some Photography Tips

The peak of the Perseides meteor shower is coming up on Aug. 12th/13th (depending on your location), so it might be a good idea to get prepared. In this blog post, I’ll cover what you can expect from the metor shower, how to find the best timing, how to locate perseus, which is the origin, and quite importantly: the best camera settings for the perseids meteor shower.

milky way and meteor shower

What to Expect?

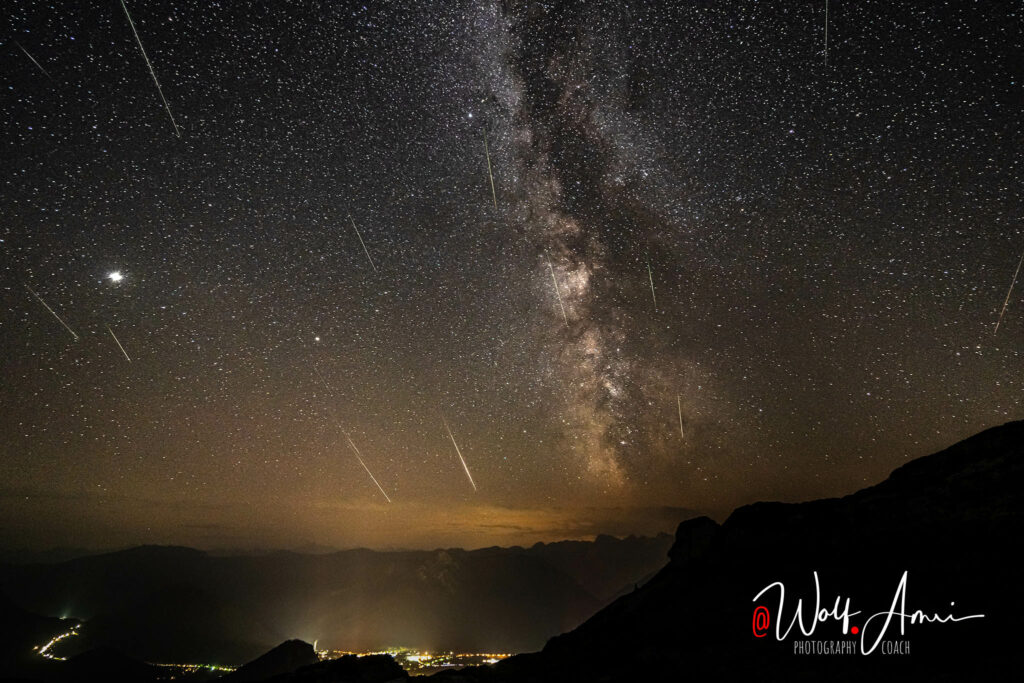
When talking about meteor showers, people usually have a totally wrong expectation. They see images like mine above (that isn’t even great tbh, in this post I’ll help you learning from my mistakes 🤣) and expect that it is going to rain meteors like it’s the end of the world.

The truth is totally different. 

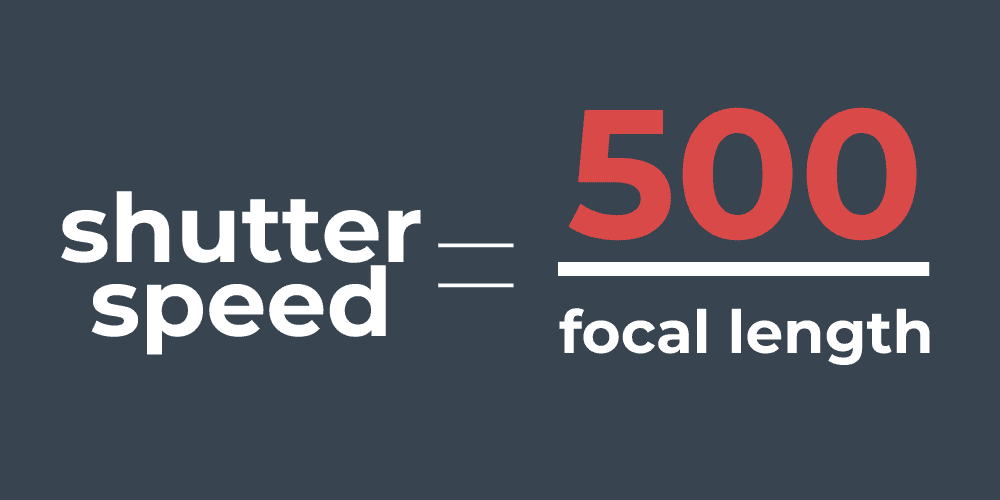
At the peak this year, we can expect a meteor frequency of 89,9/h. That’s a little over one meteor per minute! That’s close to nothing and people who often sit outdoors to do some star gazing will see meteors  every night without the need of the Perseides.

What is special is that we know the origin of the shower pretty well, being the constellation perseus. So we can align our cameras and wait for the meteors to appear in our images.

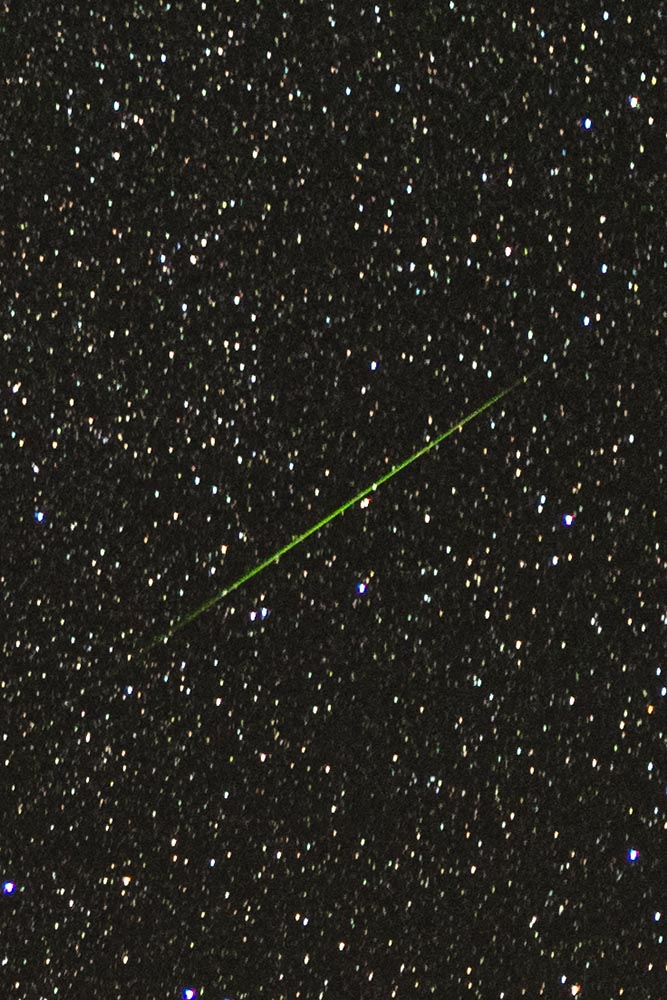
However, don’t expect much more than one or two meteor showers per image. Most of your images will have no meteors at all. If you want to create one of those spectacular perseides meteor shower images, you have to stack the shots in your editing software. Which I will explain below.

Satellites vs meteors


It’s very likely that you get excited pretty quick and think you are the lucky one who got many many meteors in an astronomical moment of glory. 
The bad news is: nope, you are not. Chances are, that you photographed mostly satellites. 
Rule of thumb: if it is slow and appears in more than one image, it’s a satellite.

Meteors on the other hand only appear for a fraction of a second, usually leave a rather short trail and the meteor trail is usually slightly colored. This image shows a rather extreme example in regard to color.

perseides single meteor

Timing is everything

Since you now know the truth and are still here, I guess you are serious about it. First things first: we need to make sure we are out and about at the best time where most meteors will appear.

Two days before and two days after the peak of the Perseids meteor shower, you’ll only get half of the meteors per hour – at max!
Same with the time on that particular day. Too early or too late and you’ll get much less meteors.

A perfect tool for getting the time right is an app called photoPills. It doesn’t only help with the Perseids shower (it has a dedicated tool for meteor showers), but with a lot of other photography related things, like Milky Way photography, shoot planning (in regard to sun and shadow), golden hour, blue hour and much, much more. It costs US$ 9,99 and is a on-time fee. It will exactly list the perfect time for your location and the number of meteors to expect at that time.

Aligning

There are in fact two ways to align your cameras: either towards the constellation of Perseus, or in the opposite direction, which is roughly the core of the milky way.
First: perseus:
That’s easier than you might think. I’m not an astronomer but a photographer. So if I can do it, you can too. Also please note, my explanations might not be scientifically or astronomically correct, but they’ll get you there 😉.

At best you first find the Milky Way. If you cannot immediately see it with your naked eye, there are also apps that will help you find it. You can use the above mentioned PhotoPills, but there are other apps too, like Stellarium, etc.. If you have a recommendation, please leave a comment, I’ll happily edit the post to include them.
Another way would be to search the web for the exact direction, but that is pretty cumbersome to be honest. Getting an app is much easier.

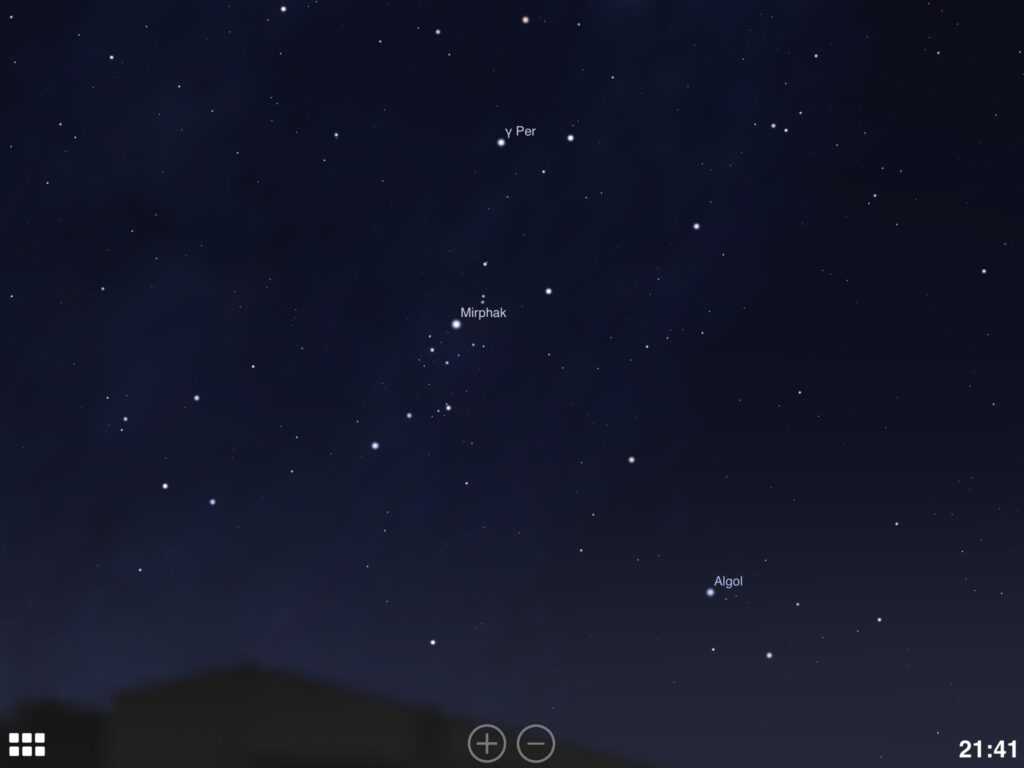
OK, back to the Milky Way. Perseus is not in the most photographed area of the milky way (the galactic center), but rather on the opposite side. So follow it across the sky, and just above where it hits the horizon, there is a pretty bright cluster (the so-called Alpha Persei cluster). That’s part of the Perseus constellation. The brightest star being Mirphak (or Alpha Persei), one of the brightest stars in the night sky. North of New York City (Naples in Europe) that star never sets. If you are using one of the above mentioned apps, you can also use their search function to search for Alpha Persei, or Perseus in general. That will make it even easier.

And the other option, is to shoot in the exact opposite direction, right towards the galactic center of the milky way.

alpha perseus screenshot stellarium

Camera Settings for the Perseids Meteor Shower

The camera settings for a meteor shower are no different than for regular Milky Way shots. So if the weather is good, you have a few days to practice that. At the moment the visibility of the Milky Way is great, because the moon is new and not on the horizon during most of the night. 
Why could that be an issue? Because the moon creates a lot of light pollution, just like bigger cities do. So you also want to be as far away from cities or towns as possible for the best results. To find great locations, I’d recommend using a light pollution map. The above images were shot at a so-called Bortle 3 location, so a rather dark sky. But in the background are the suburbs of Vienna, so not actually the best place either.


Aperture

Since you should know by now that a bigger aperture will let more light into your camera and you probably understand that it’s pretty dark at night, you will use the smallest f-number your lens supports.

Shutter Speed

The shutter speed for the perseids is in fact also a constant that depends on your lens. 
Too long shutter speeds will create star trails because the stars move faster across our horizon than you might think. Too short shutter speeds will not let enough light in and create a dark exposure
So you want the longest shutter speed, that doesn’t create star trails. 
There are several different formulas for that, and for example PhotoPills that I mentioned before will do the calculations for you.
The easiest formula is the so-called 500 rule. 

To get your shutter speed, divide 500/focal length.
So if you for example use a 25mm lens, you can use a maximum shutter speed (remember shutter speed=exposure time 😉) of 500/25=20sec. 
So surely realized, that the wider your lens, the longer you can expose without getting star trails.

500 rule formula

There are other formulas that also take sensor size and resolution into account, but this is a great starting point. If you really want to go into detail, I’d strongly recommend getting an app like PhotoPills, because then it’s absolutely worth the few bucks.

ISO

OK, that leaves ISO and as you know, ISO is the gain. You want it as low as possible.
But since it is really dark out there, you will have to raise it quite a bit. A good starting point for a kit lens (where the maximum aperture is f/3.5 and the longest shutter speed is roughly 25sec (according to the 500 rule)), is ISO3.200.

ADDITIONAL TIP!!!

To make the meteors brighter relative to the stars, you could use a slower exposure time and compensate that with a higher ISO.
The metors are only visible for a fraction of a second, so the long shutter speed that you’d usually choose for stars doesn’t affect them. A higher ISO however does.
That will obviously give you more noise, but that’s now on you to decide.

Focus

First and foremost: you want to use manual focus. So far no camera can auto-focus on the stars.
The bad news: it is really tough to focus with entry-level gear. But it’s doable.

What you want to do is :

  1. center the brightest star in your frame
  2. set your camera to live view
  3. zoom in all the way on that brightest star
  4. manually focus until it is as sharp as possible
  5. without touching the lens, frame your shot

There are other ways to focus, like

  • focusing on a very distant light (of a city if you are not far enough away from a city),
  • focus during daytime on a very distant subject and then tape down the focus ring
  • using an external HDMI monitor (brighter and bigger magnification)

Interval Timer

In order to get as many meteors as possible, you want to shoot as many images as possible. An interval timer is the perfect tool for that. It will shoot images at a set interval.

Some cameras have built-in interval timers, but there are very cheap ones available. You don’t need the ones from primary manufacturers, they all work the same.

If your shutter speed is 25sec as in the example above, you would assume that you can set the interval to 25sec. But be careful: cameras need some time to save the image. So you need to give it a few seconds to do that. How many, depends on your camera, so you’d better do some tests before the big day. Once you know how long it takes, you add these seconds to the 25sec and get your interval.
Now the camera will shoot images with set interval as long as the battery lasts.

Additional Tips

  • Turn off long exposure noise reduction in your camera, otherwise the camera will take twice as long for every single image.
  • Depending on the region you live in, moisture can be a big problem, if you let your camera run for a few hours. There are dedicated tools to avoid dew accumulating on your lens. Let me know if you need some links.

Editing

To combine your shots, you need photoshop or something similar. I’ll make a tutorial for that after the meteor shower. Then I hope I not only have the images from last year, but new ones too. 
Wish me luck that there will be no clouds obstructing the view.

Leave a Comment

Your email address will not be published. Required fields are marked *

Login to your account

Email *
Password *