Why to use ND Filters?
before I explain the ins and outs of ND filters, let me tell you why they are used in modern days.
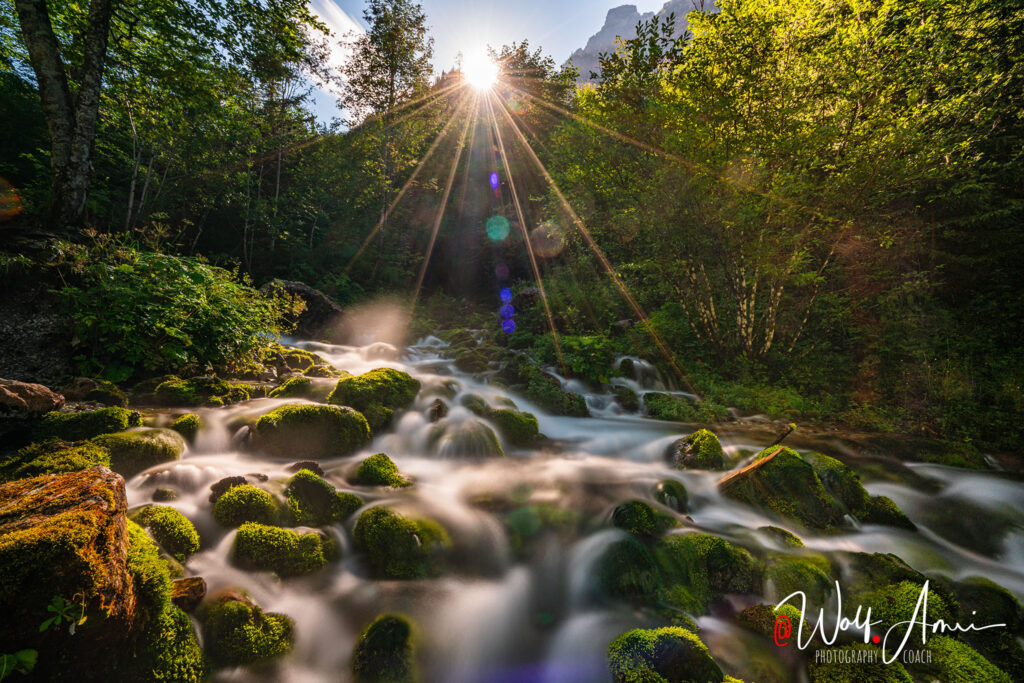
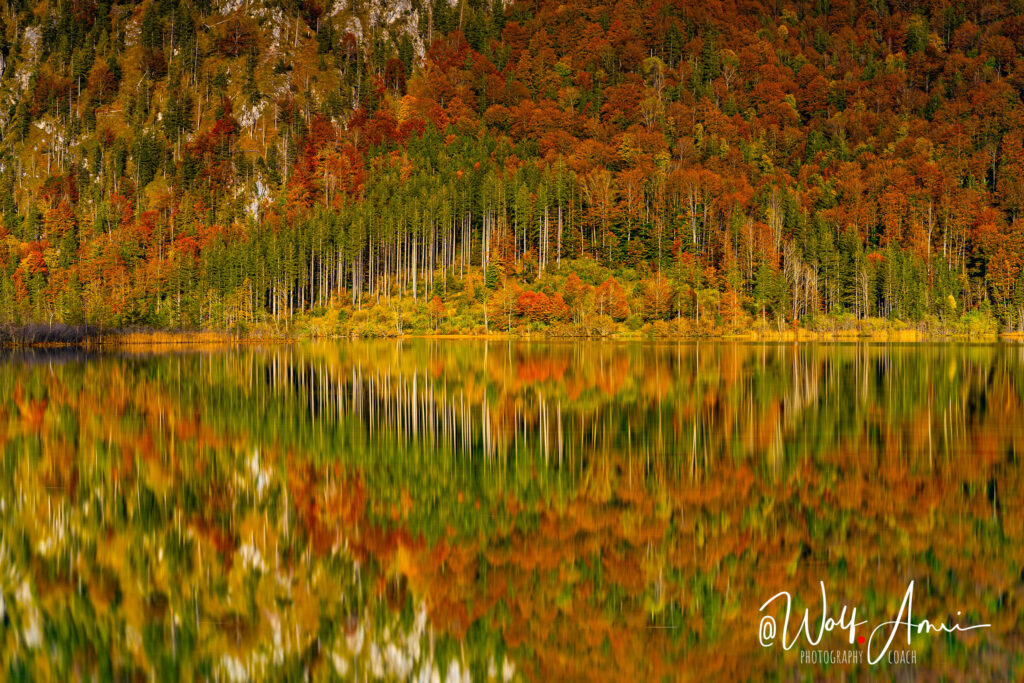
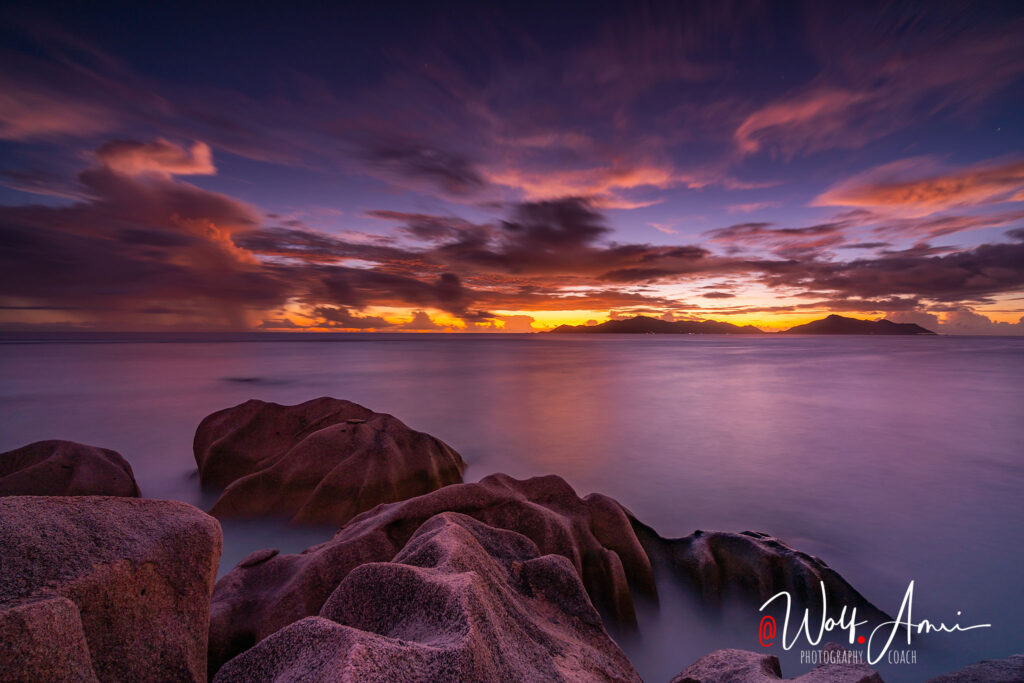
To Blur Water
When photographing waterfalls, many photographers like that beautiful silky smooth, misty look. The same goes for beaches. To achieve these pictures, you need to use long exposure times (shutter speeds). It starts to get interesting at shutter speeds of 4sec, but for some longer is better.
In daylight hours, these shutter speeds will lead to extremely over exposed (too bright) images, even if you try to compensate the added brightness by changing the other camera settings. There are just limits to what a camera can do.
ND filters reduce the amount of light that can enter the camera and depending on the density of these filters you can theoretically extend the shutter speed to several hours (which of course wouldn’t make much sense).
Same goes for the water on the coast, or on lakes.
In Flash Photography to Blur the Background
When photographing portraits, many of us like to blur the background. You probably know by now that it requires to use low aperture numbers to achieve that effect.
Low aperture numbers let a lot of light into your camera, so in order to not over expose the complete shot, you will need to compensate that with a fast shutter speed.
So far so good. But when photographing with flash, you must not use faster shutter speeds than the cameras max synch speed. To understand why, check out my advanced shutter speed knowledge section and scroll down a bit. Staying within that max synch speed will very often over expose your image.

One alternative to combat that issue is using so-called hypersync flash or speedlights. But hypersync comes with a downside, it has to fire multiple flashes and therefore eats flash power.
Photographers who don’t have all that powerful flashes, or those who simply want to save flash power use ND filters instead of hypersync. They will reduce the light entering the camera and you can therefore shoot at slower shutter speeds.
Other Creative Effects
Literally anything that requires slower shutter speeds, like blurring the motion of people, up to a degree where you can make rather crowded places look almost empty. Just like in above cases, ND filters reduce the amount of light entering your camera and will therefore let you set slower shutter speeds.
For Video
Many videographers like a so-called “cinematic look”. Part of that look is a shallow depth of focus and a rather slow shutter speed that adds natural blur to moving people and subjects rather than having motion extremely sharp like you have seen e.g. in fighting scenes of the movie 300.
To achieve that smooth motion, you have to use slow shutter speeds. As you have read above, slow shutter speeds would let too much light into the camera and therefore over expose the video.
Many professional video cameras therefore have built-in ND filters. Others use screw-on-filters or filter systems.
The above wedding-video filmed by my wife Birgit and me was shot using variable ND filters. If you are interested in our wedding videography, check out weddingmovies.at
To Reduce Dynamic Range???
THEORETICALLY, using ND filters will reduce the dynamic range of a scene.
So if you have a scene with a very high contrast – so with very bright parts (like snow) and very dark parts (like a black sheep in that snow), using an ND filter will reduce that dynamic range.
BUT: that physical effect is extremely small and can not really be seen. What often happens and what people are mistaking is, that there is some sun flare created by the sun entering the filter/lens. That will in fact reduce dynamic range, but is actually an effect you want to avoid.
What are ND Filters?
These filters basically reduce the amount of light that your camera sensor is exposed to.
"N" Stands for Neutral
The N in ND filters stands for neutral, meaning that adding an ND filter doesn’t change the color of the image. Theoretically, because in fact hardly any of these filters is really neutral and particularly variable ND filters can change the color throughout their range. The difference is not too big though and can be easily corrected in photography if you need to.
A little more difficult is correction for video use.
"D" Stands for Density
The D tells you that the filter has an optical density that absorbs light.
If you look at ND filters with different densities, you will find out that they are like differently dark sunglasses. They start at very low densities of 1/2 EV (EV standing for exposure value) and currently end at 20EV (For example the Haida One Million X).
One EV (photographers call it “stop”) reduces the light in half. So 20EV would be 1/2 of 1/2 of 1/2 of 1/2 of 1/2 of 1/2 of 1/2 of 1/2 of 1/2 of 1/2 of 1/2 of 1/2 of 1/2 of 1/2 of 1/2 of 1/2 of 1/2 of 1/2 of 1/2 of 1/2 or in other words roughly 1/500.000th or “pretty dark”.
ND Stands for Neutral Density
Combine the two and you understand that ND stands for neutral density – so neutral colored filters that do nothing but absorb light. That’s why people sometimes call them grey filters.
What do the numbers of ND filters mean?
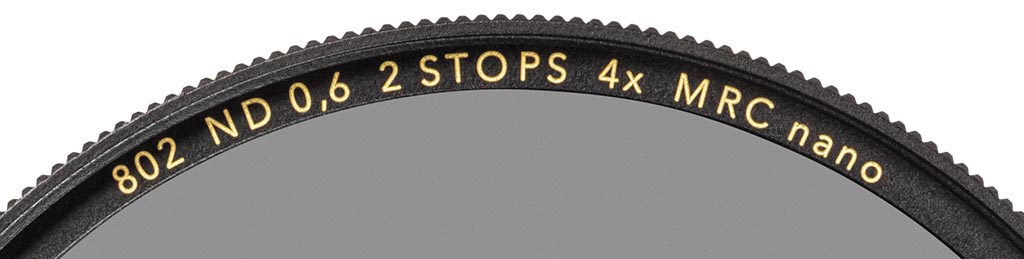
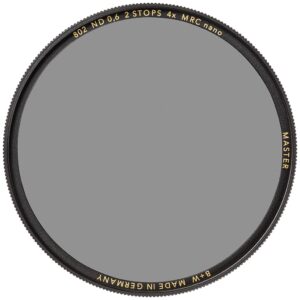
As so often in photography, there is no one clear descriptive label on things. There are 3 units for ND filters and unfortunately they are used alternately, depending on the manufacturer. At least some manufacturers are clever enough to list them all to make things a bit easier, like B&W Schneider Kreuznach in the example above.
So on this filter, ND 0,6 means the same as 2 Stops ND or 4x ND. Pretty silly, but that’s the truth.
Let me explain these ND filter units below on the example of a basic 1 stop filter (ND 0.3 = 1Stop ND = ND2x)
Optical Density (ND 0.3)
Here is the surprise: despite the physical nature of this unit (I will save you the formula), this one is probably the easiest unit to use when dealing with ND filters in real life.
See it this way:
- to compensate e.g. shutter speed when using an ND 0.3 filter, you have to turn the shutter speed dial by 3 clicks (steps).
- To compensate for an ND 0.6 filter you have turn the dial by 6 clicks
- ND 0.9 by 9 clicks
- ND 3.0 by 30 clicks
Stops (1 Stop ND)
The second and among photographers most often used unit is stops. You will often hear: “get a 10stop ND filter”, or “get a 6 stop ND filter”. If you are not familiar with the term “stop”, it actually stands for EV. Check out this link: stops in photography explained.
So this unit will tell you how much stops of light you will lose by adding that filter.
This unit helps a lot with your purchase decision, when you listen to other photographers, but it doesn’t really help you all that much with using it.
ND2 - Light Loss
Maybe the easiest to understand, but not the easiest to use unit for ND filters, is the light loss.
ND2 means the light left when using that filter is 1/2
ND4 means the light left is 1/4
ND8 means the light left is 1/8
and so on
So 1 divided by the unit tells you how much light is left when using the filter.
The weird thing is, that like in the example image above, they are often listed as 2x despite actually only letting 1/2 the light in, which is the exact opposite.
While that info is generally interesting, it usually doesn’t help us photographers unless we get our calculators, which is nothing what most of us like doing.
Variable NDs (Var ND)
Var ND filters actually aren’t real NDs, but rather two stacked polarizer filters. They have advantages and disadvantages. In regard to the above mentioned units, they make it a little more difficult to tell which density you have currently set. Some have marks, others don’t. I recommend them for video use, but not so much for photography use despite being very convenient.
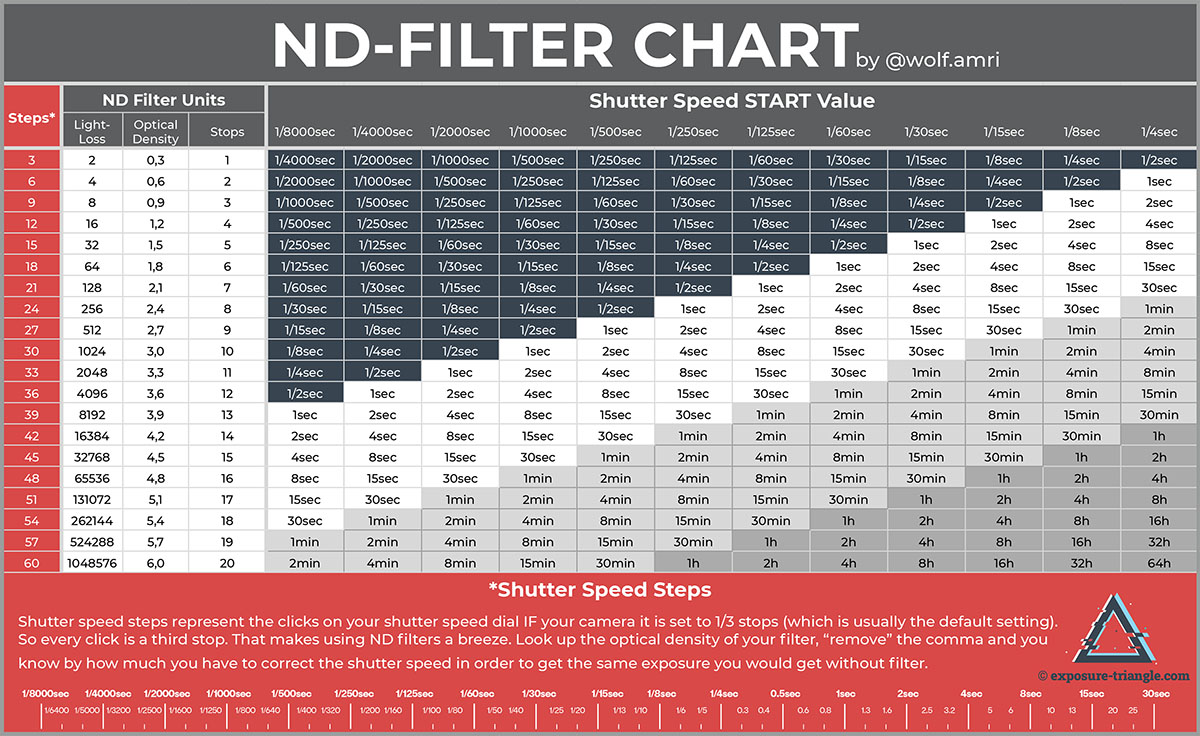
ND Filter Chart
When using ND Filters, you often need to know by how much you need to change the exposure settings to compensate for the use of the filters. The following ND Filter chart will help you.
I have added a new dimension to the chart, being “Steps” to make using ND filters MUCH easier.
What is a step? One step is one click on the dial of your camera when you change the shutter speed. So that number tells you exactly by how much you need to change the shutter speed.
PLUS: at the bottom of the chart I have added a list of all the available shutter speeds in these exact steps. So if you rather want to look it up than cont the dial clicks – you are free to choose.
Let me know in the comments below how you like it and if you have questions regarding the ND filter chart.
Which ND filter to buy
When buying an ND filter, you first need to decide which “type” of filter you want, and then which density.
Which type of ND filter to get
Screw-on vs Filter System vs Clip-on
That depends. Every system has its advantages and disadvantages
Regular Srew-on ND Filters
Screw-on Filters are great if you know exactly what filter you want to use and when you don’t want to stack filters.
Var NDs are screw-on only. But some of the below mentioned disadvantages don’t apply to these.
Advantages:
- Tight fit
- Rather lightweight (depending on the metal though)
- Are usually rather slim so can easily be stacked
Disadvantages:
- Need to be changed depending on conditions and type of desired image
- Cumbersome to change
- Get stuck at times (then you may need a filter remover or work with rubber or similar)
- Unless they are slim filters, they can produce vignetting with (ultra) wide angle lenses.
- You need step up rings for different lens sizes.
Magnetic Srew-on ND Filters
A special type of screw-on filters are magnetic filters. There is a base filer holder that is screwed onto the camera and stays there. The filter itself is then easily put on with magnets.
Advantages:
- Very convenient to put on and remove
- Can be quickly changed from one lens to the next (if you have multiple base magnet rings)
Disadvantages:
- More expensive
- Don’t sit as tight as regular screw-on filters
- Needs an additional lens cap.
- You need step up rings for different lens sizes.
They are easy and fast to change and come with a magnetic lens cap, which obviously is partly made of metal and is a bit heavier than normal lens caps. Examples for magnetic ND Filters can be had from Freewell or other brands.

Clip-in ND Filters
Rather new on the market are clip-in ND filters, like the one in this image by Kase. They sit between the sensor and the lens.
Advantages:
- Very quick changing of lenses – no need to unscrew filter – change lens and attach the filter again.
- You only need one filter for various sized lenses (no need to use step-up rings or different sized filters)
- Their location in the camera makes them less prone to lens flare and reflections
- Lightweight
Disadvantages:
- Many of them fit only one camera brand or even camera make. So when you want to change camera, you might have to get new ones.
- Personally I feel you can much easier introduce dust into your camera.
- No stacking possible unless you combine it with one of the above options.

Filter Systems (Filter Holders / Square Filters)
Filter systems are used by photographers for ages. They come with slits that let you usually place three glass filters into the holder and an additional slot for a polarizer filter. The one on the right is from Nisi, but there are many other manufacturers who produce them these days.
They are available in different sizes.
Advantages:
- The biggest advantge IMO is, that you can not only use Grad NDs, but since the Grad NDs are usually longer, you can place the gradient wherever you want it. That is impossible with screw-on filters.
- You can easily stack multiple filters. Not only multiple NDs to get even more density, but also a polarizer and/or a grad ND filter.
Disadvantages:
- Big and rather heavy
- More expensive
- Break easier when you drop them because most of them don’t have a frame. Lately K&F introduced a rather affordable set that even includes a frame.

Which Density of ND Filter to Get
That’s a tough question. Depending on your use, my recommendation would be the following:
10+ Stop ND to Blur Water
To blur waterfalls, and lakes, I would recommend a 10 stop ND filter (= ND 3.0 = ND1000). If you are at a beach and the water is really wild, an even higher number, like 15 stops (=ND 4.5 = ND30.000).
But you can stack two filters (with side effects though).
Filters I’d recommend (Amazon referral links):
6 Stop ND for Flash Photography
In bright sunlight, a 6 stop ND filter (=ND 1.8 = ND64) will roughly give you exposure settings of ISO100 | 1/200sec | f/1.4 – right within the max. synch speed of most cameras and a low-enough aperture to get you really nice bokeh.
If you want to under expose the ambient light by a stop, lowering ISO to 50 as available on most modern cameras will let you do even that.
Would you have thought that this image was shot with a flash? A big softbox from the right brightened the shadows. Flash used: Godox AD300pro

Variable (Var ND) Filters for Video
For video use, I’d strongly recommend variable ND filters. Since you are limited to a certain shutter speed and the light can change big time for example when filming a wedding, I recommend and use var ND filters. We film a lot with them. If you want to see the results, have a look at our own website: wedding videographers Austria.
Filters I’d recommend:
I strongly recommend the Freewell Magnetic Variable ND. It is pretty expensive (US$ 399), but it is outstandingly versatile and fast to remove in case you get into low light, which is incredibly important when shooting events like weddings. Not so much if you are shooting a feature film. In that case I’d rather recommend a filter system like Nisi, Kase or K&F (sorted by highest to lowest price, but also by quality – with some of them you have to purchase the filters extra to the holder, some include them)
Graduated ND Filters (Grad ND)
Graduated ND filters are a special type. They are transparent on one end and towards the other end a gradient makes the glass fade into an ND filter. That is particularly helpful for example with sunsets, when the sky would get over exposed and the foreground would be under exposed.
You could theoretically get a similar effect while editing, but that would introduce more noise in the dark areas.
The downside of grad ND filters is that if you for example photograph a tree, or a mountain in the foreground, that too would gradually become darker towards the top.
ND-Filter and Polarizer Filter combined
Brands/Quality
The filter quality can change from brand to brand. Unfortunately I haven’t tested them all. Some have a slight color cast, which usually isn’t all that much of a problem.
Others have more problems with lens flare (when the sun shines right into the camera or comes from the side). The better they are coated, the better they are in this regard, but also the more expensive.
High-End filters are Nisi, B&W, Tiffen and others.
ND Filters FAQ
Yes you can. Exposure Values can be measured in lux. A regular light meter can do that. A photographic light meter can even convert the exposure values into camera settings.
Of course, I do 😉. There is a small resolution version above and a high-resolution pdf in the downloads section.
Please comment below. I will constantly update this section with new questions.
Great article Wolf, this information answers a lot of questions I had regarding ND filters and has solved one or two issues already in using them, as a beginner seems to be a lot of information here to evaluate.
However the best part is how it is communicated, it looks to be a lot easier to understand than other information sources I have come across, Wolf’s has the gift of making it easier to learn, content is clear and to the point. The cheat sheet is an added bonus, all helps to go out and take a decent photo at the end of the day.
Well done Wolf,
Awesome! Great to hear that, Charlie. Enjoy the ND filters. They are so much fun to work with!
Hey Wolf, for some reason I can not see your Amazon Referal links? Would you please send me one for the .de site?
Want to buy a 10+ Stop ND filter.
Was recently in Switzerland at a very beautiful lake and got bummed I couldn‘t take the images I had pictured in my head.
Hey Mutsa awwwwwwww, thank you so much. With great pleasure: https://amzn.to/3CzpXR3
I assume you are looking from a mobile device? I have removed the help-me link because it was so prominent on smartphones. There is no easy way to change that – unfortunately.