ISO explained

Or better: gain

Table of Contents
COPY TO CLIPBOARD

Copy a link to the page-section below to the clipboard

ISO IN A NUTSHELL

Scroll down for a very detailled description.

What is ISO?

ISO is actually a pretty weird name for the “gain”. It is short for International Standards Organisation*, and there are thousands of ISO standards flying around in the tech world. That the photography world decided to use the name of the organisation that standardized the gain  instead of using the term “gain” itself is beyond confusing.

*to be correct, it’s International Organization for Standardization

A Quick Summary

To better understand what ISO really is, let’s recap exposure. If you are new to this site, I recommend starting here. For everyone else, here is a quick  roundup of what you learned so far, looking at this 20sec video.

The light of your scene that can be brighter or darker, passes through the aperture and once the shutter opens, the sensor is being exposed to that light.

When the shutter closes after a certain time (exposure time = shutter speed), the process of exposure has ended.

Wait, did I just say exposure has ended? What about ISO, the video clearly shows that it raises the brightness of the image?

So: ISO is the Gain!

Check out my youtube channel!
It's even easier to learn with videos
0
views
0
subscribers
0
likes
COPY TO CLIPBOARD

Copy a link to the page-section below to the clipboard

How Does ISO Work?

Do you remember how light particles expose the camera sensor?
Let’s take an even closer look. This time we zoom in on the sensor and take a look at one single pixel that gets exposed to the light particles. This single pixel on our sensor is called sensel. If you want to see single pixels, open an image and zoom into it as much as you can – like I did in this image. Every square is a single pixel that is created by a single sensel.

To better understand ISO we need to understand what a single sensel does, and this is best done with an easy animation. See the grey bar in the animations below as a measure for image brightness. The more the bar raises, the brighter the pixel – and with it the image would get due to more counted photons.

Example 1: ISO 100, short exposure time

The shutter opens and the sensel – which is kind of a well counts the photons that fall into it until the shutter closes again.
After the shutter closes, the sensor cannot count any light particles anymore because the shutter blocks all the light. Therefore exposure has ended.

Due to the short exposure time (fast shutter speed), the sensor didn’t count all that many light particles.

The result is now forwarded to the processor. Since ISO is set to 100, nothing happens The image would be rather dark.

Example 2: ISO 400, short exposure time

Now what if I used ISO400 instead of ISO100?
The same amount of light particles are counted and forwarded to the processor. But this time, the processor amplifies the very same signal 4x to make the image brighter.

But the number of photons counted hasn’t changed at all. That added gain basically fake-fills the pixel with “light particles” that haven’t even been there, to create a brighter pixel. And as you can see with the text that is distorted, that adds some negative side effects that we will discuss later.

Example 3: ISO 100, longer exposure time

For comparison: instead of using the gain to brighten the image, you could open the shutter for a longer period of time (exposure time = shutter speed) to let more light particles in. You would have gotten the same brightness, that you would get by raising ISO, but without the disadvantages that we will discuss in a second.

So again: ISO is the Gain

And gain always comes with downsides (well, except for electric guitars 🤣).
SO HERE IS SOME VERY IMPORTANT INFO: Before you use the gain, you usually want to squeeze out every possible bit of the real exposure components shutter speed and aperture.
That doesn’t mean the gain is bad though. When it is needed, it’s totally fine to ask for its help. More on that further below.

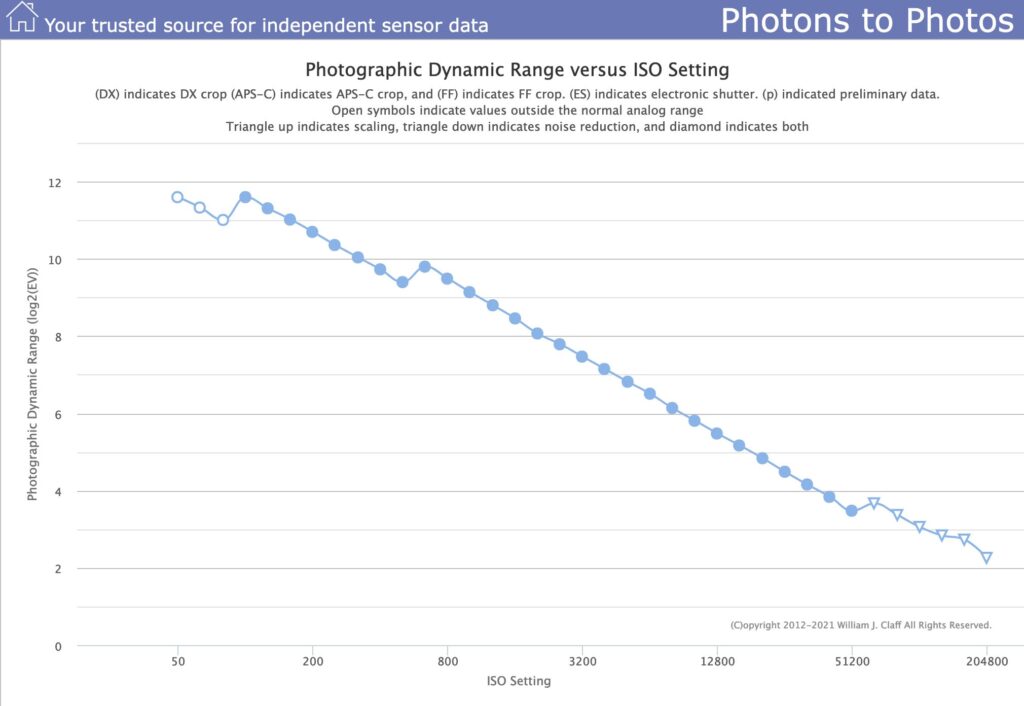
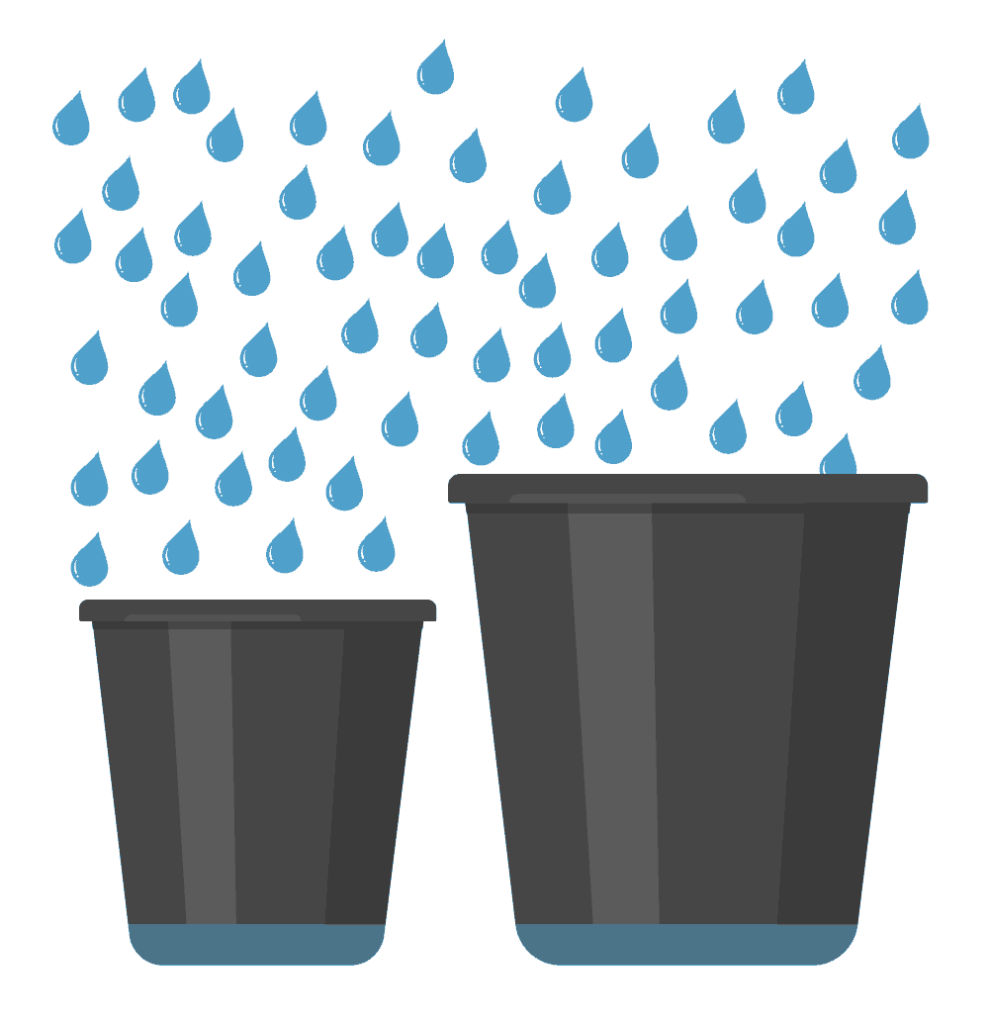
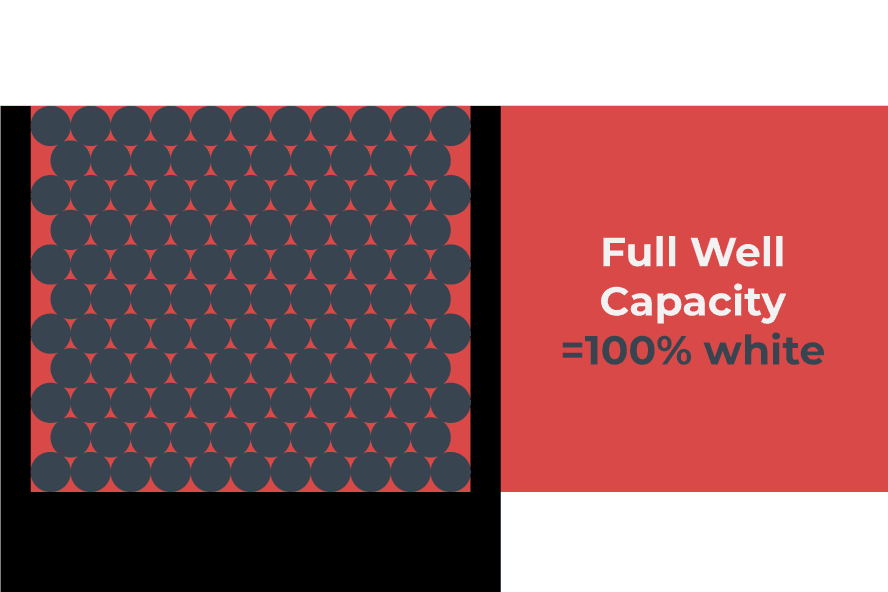
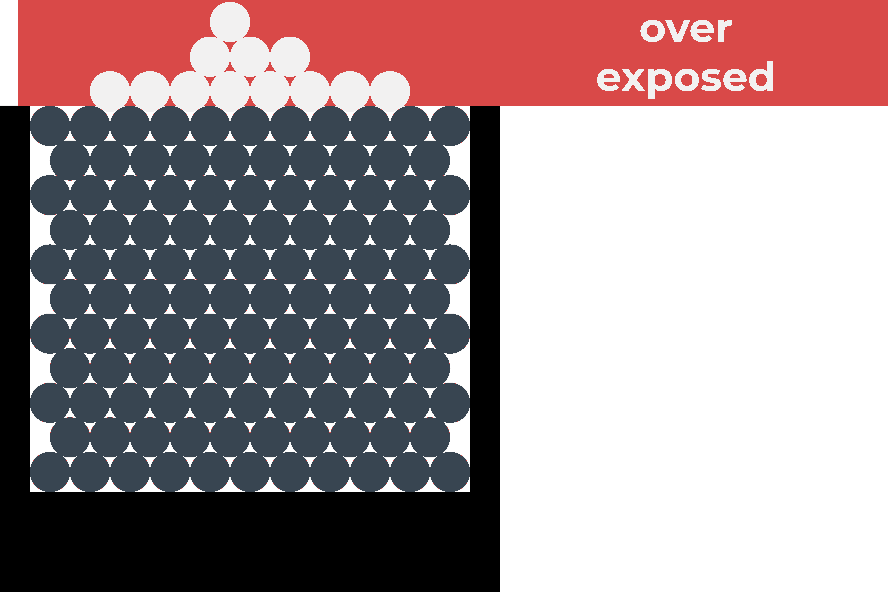
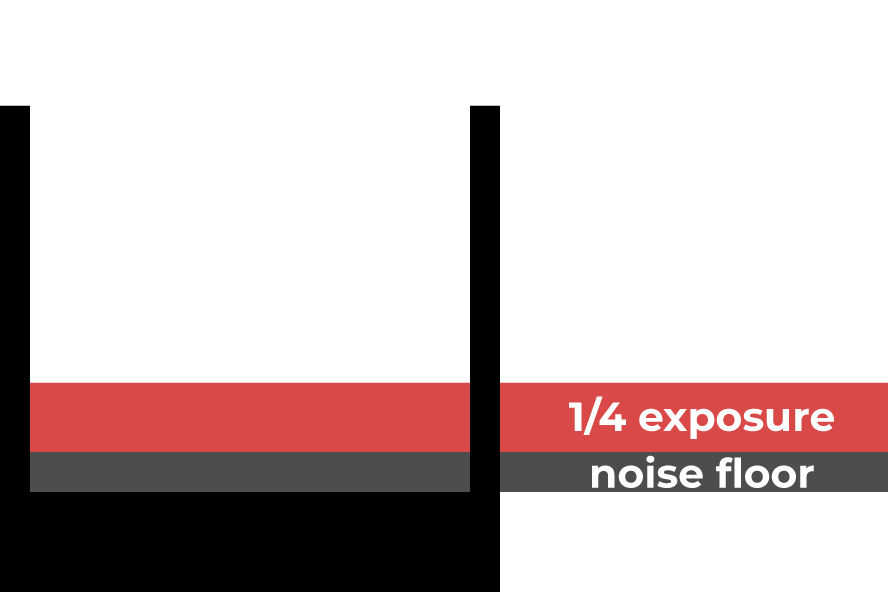
"Before you use the gain, you usually want to squeeze out every possible bit out of the real exposure components shutter speed and aperture."
Wolf Amri Thinking
Wolf Amri
Photography Coach

COPY TO CLIPBOARD

Copy a link to the page-section below to the clipboard

Common Misunderstandings Regarding ISO

Weirdly misunderstandings in regard to ISO are much more common than correct info. So let me start with these to get them out of your head.

1. ISO Does Not Change the Sensitivity of the Sensor

Changing ISO doesn’t change the sensors sensitivity to light as many people want to make you believe. It would be amazing if it did because then ISO wouldn’t lead to negative side effects. Changing the sensitivity would require the sensor to physically and electronically change. That’s not the case. The sensor stays the same no matter what ISO you set*. In fact ISO doesn’t even “happen” within the sensor, but later when the data is sent to the processor.

When you double ISO, the camera basically thinks: “oh, let me just cheat a little, do as if I counted twice the light particles and double the brightness of what I just recorded.”

And that is very similar to raising the brightness of your (RAW!!!) image in Photoshop. So basically, raising ISO is the first step of image editing. More on that in the more advanced part further down the page.

ISO is the gain that is applied by the processor of your camera

*Very few cameras have two native ISO settings, but the rest of the ISO settings on these cameras is still only gain.

2. ISO is Not Part of the Exposure

Above I said ISO is the gain that is “added” after exposure? The very popular Exposure Triangle however, lists it as part of exposure.

Why is that important? Because if you can get the image brightness using only the components of exposure (being scene luminance, aperture and shutter speed), you could avoid the negative side effects of raising the gain.

Listing ISO as part of exposure instead of exchanging it with scene luminance is the single biggest issue that causes confusion in photography. People who start learning photography with the help of the triangle, don’t understand that the base of it all is light (or brightness). Instead, they think the camera settings aperture, shutter speed and ISO are magic ingredients that you somehow need to mix together to get the perfect image brightness. NO – they are a reaction to the light that you have available and that changes dramatically in different situations.

Instead of that light (remember, it is called scene luminance) the Exposure Triangle lists ISO, which doesn’t have to do anything with exposure because it is added after the shutter has already closed. That basic mistake is keeping millions of photography enthusiasts from understanding photography.
Let me repeat what I said before: Before you use the gain, try to squeeze out every bit of the real components of exposure, shutter speed and aperture.

The Wrong Exposure Triangle

The Correct Exposure Triangle

COPY TO CLIPBOARD

Copy a link to the page-section below to the clipboard

Understanding ISO Numbers

While the ISO units with 100, 200, 400, 800 ISO are not as confusing as aperture numbers, they are still way more confusing that they need to be. There are two ways of making ISO numbers easier to understand.

See ISO as the Gain Factor

If you remove the “00” after every ISO number, ISO “100” becomes “1x”. See that as the factor by which the natural light is being amplified – so the gain factor.

  • “1x” means the light is multiplied by 1, so no gain will be added.
  • “2x” means the camera processor doubles the original brightness that was measured by the sensor.
The easiest way is to remove the "00"
ISO 100 becomes gain factor 1x
ISO 200 becomes gain factor 2x
ISO 400 becomes gain factor 4x
and so on...
ISO
Gain Factor
ISO 1001x
ISO 2002x
ISO 4004x
....
ISO 320032x
ISO 640064x

OR: See ISO as Percentage

If you are more a maths person, see ISO 100 as 100% so you take 100% of the light that is available without adding anything to it.

  • ISO 200, will raise the gain to double the brightness that your sensor measured, so 200%.
  • ISO 400 doubles that again and increases the brightness the sensor measured to 400% and so on.

Some cameras even have ISO 50, meaning that the light recorded by the sensor is artificially reduced to 50%. If you wonder where this is helpful: consider using an 85mm f/1.2 lens in bright sunlight. Even using the fastest shutter speed of your camera would get you over exposed images at f/1.2.

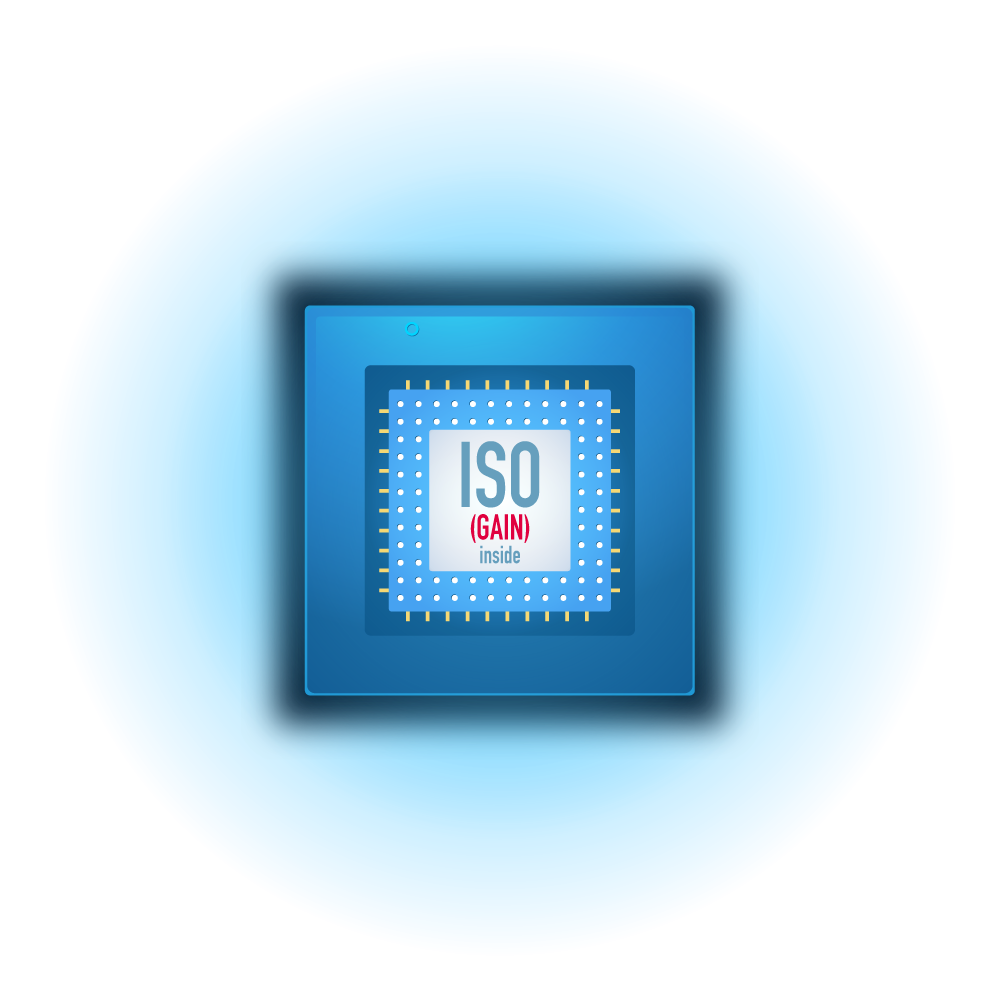
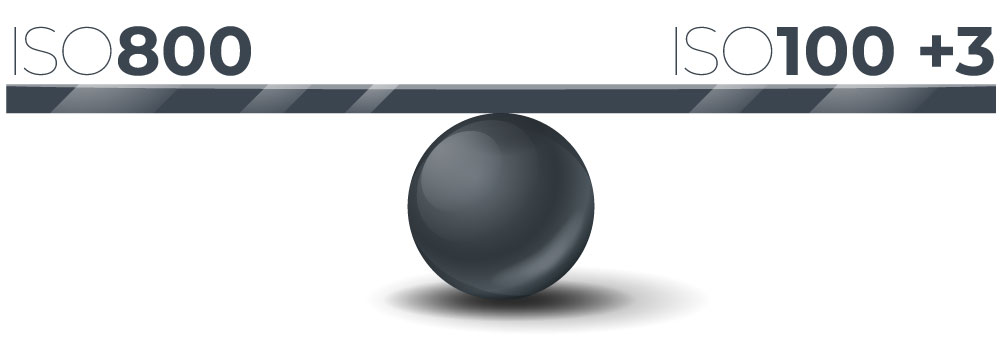
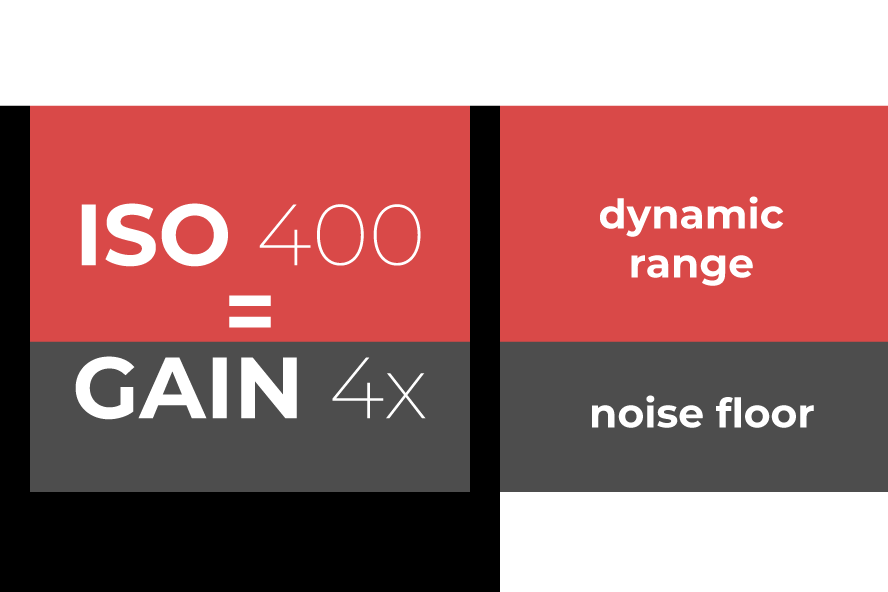
"Don't overthink ISO - see it as gain and the numbers as factor or percentage"
Wolf Amri Thinking
Wolf Amri
Photography Coach

COPY TO CLIPBOARD

Copy a link to the page-section below to the clipboard

The effects of ISO

1. Image Brightness (Not Exposure!!!)

Doubling of Image Brightness AGAIN!

Remember the factor above? For the fourth and last time (after scene luminance, aperture and shutter speed), we see that doubling of image brightness, or in other words the concept of a “stop” or “EV”. So doubling ISO will double image brightness.

aperture portrait f1 4
ISO graphic in bold letters

50

Image shot at ISO100
ISO graphic in bold letters

100

Image shot at ISO200
ISO graphic in bold letters

200

Image shot at ISO400
ISO graphic in bold letters

400

Image shot at ISO800
ISO graphic in bold letters

800

Image shot at ISO1600
ISO graphic in bold letters

1600

Image shot at ISO3200
ISO graphic in bold letters

3200

aperture portrait f1 4
ISO graphic in bold letters

6400

Important note: don’t be fooled and think you need a higher ISO because this is a night shot!
I will repeat that for you over and over. Whenever you can, use exposure instead of gain to get the perfect image brightness.
In the image below, I used a longer exposure time to avoid the gain all together and shot at ISO100, despite the low light levels. I even used bulb mode and exposed for 2minutes to blur the movement of the water. No doubt, you’ll need a tripod or place the camera on something solid for that. But it changes the image quality dramatically.

Use a longer exposure time to avoid gain
121sec | f/11 | ISO100

But getting back to that doubling of light again. You surely remember the very same effect of doubling image brightness from aperture and shutter speed. If you can get the same image brightness each time, but with different camera settings, it means that…

...Stops are Interchangeable

In photography these “stops” and with it the connected doubling of image brightness are super important. It means that all the camera settings are interchangeable. If you want to brighten your image by one stop (double it) you can choose whether you want to do that with aperture, shutter speed or ISO.

If you want to keep the brightness constant, but want to raise one – let’s say the aperture-number to get a bigger depth of focus – you need to compensate for that with one of the other (shutter speed or ISO) in order to get the same image brightness.
I will discuss which setting to chose over the others, on the next page.

Just to water your mouth: I have created a cheat sheet for exactly that purpose.

exposure values: 3 steps = 1 stop = 1EV

If you register for free on this website, you get access to our download section can download the chart above as a printable pdf.

or

COPY TO CLIPBOARD

Copy a link to the page-section below to the clipboard

The ISO Range

Depending on your camera, ISO often ranges from 100 to 6400 (or even lower for older cameras), which is 6 stops, or in extreme cases from 50 up to 102400 (currently), which is 11 stops. Smartphones often start at 25 and only go up to 2000, which is also roughly 6 stops.

ISO range in stops

On a sidenote: In the chart above, the numbers in between the bigger numbers are third stops and let you choose smaller increments to give you finer control over the image brightness (as explained here: smaller increments of exposure). Be aware though that some entry-level cameras will not let you set these smaller increments, but will rather only let you choose the ones in bold letters above (e.g. Canon t7, t7i,…).

The advantage of cameras with a max ISO of 102.400 over a camera with a max ISO of 6.400 is 4 stops, so 2x2x2x2, which means that after applying the gain, your image can create an image that is 16x as bright.

Where is that helpful? First of all, cameras with a higher max. ISO have a sensor that is much more capable in low-light and creates less ISO noise at a certain ISO setting, more about that in the next paragraph.

But there is more to it than that. You have probably realized, that when shooting in live view (or on mirrorless cameras shooting in general), your camera will show a preview of the image as it will be saved onto your card. That preview has limits in low light and if you try to photograph for example the milky way, the stars will be very very faint in a camera with a low max. ISO setting. That makes focusing really really hard.

On a camera with a much higher ISO setting, the camera can raise the gain for the preview much higher and will therefore make manual focusing much easier. Here is a rough estimation what a camera with a low max. ISO sees compared to a camera with a high max. ISO. This is a 4 stop difference.

low ISO camera high ISO camera

Shooting in low-light scenarios, cameras with a higher ISO rating usually also have less issues to autofocus. Combine that with the added noise and you may get into trouble.

Some people forget about these facts and get frustrated. In our Photography Beginners Group on Facebook, I often read “I am bad at low light photography”. No, you are not, it’s the camera that performs better or worse at high ISO in combination with lenses that let you set lower f-numbers, that make all of a difference here. See my video “can you be bad at low light photography” on Youtube.

COPY TO CLIPBOARD

Copy a link to the page-section below to the clipboard

The effects of ISO

2. unwanted noise ("Grain")

In a nutshell (a more in-depth explanation can be found below), higher ISO levels create noise in your images. For those of you who can’t really imagine what difference that makes and what noise really looks like, here are two 100% crops of images. The left was shot by “achieving” the brightness with a longer exposure time (which means you use actual light to brighten the image), the right was shot by just raising the gain to “fake” the brightness.

low ISO high ISO

How well that noise is visible depends on the size in which you intend to use the final image and on your viewing device. If you plan to only post it on Instagram, you can easier live with noise, than if you want to print it large and hang it onto your wall. Would you have thought that this image is the same as the one above on the high ISO side?

Talking about Instagram: if you want to follow me, check out @wolf.amri

high ISO image
COPY TO CLIPBOARD

Copy a link to the page-section below to the clipboard

How to Avoid ISO Noise
By Seeing ISO as an Emergency

It’s pretty simple: see the gain as the ambulance. Whenever possible, use the other settings to get the brightness you want. But call the ISO-ambulance in case of an emergency.

What is an ISO-Emergency?

Let’s say you want to photograph a bird in flight, you want a shutter speed of 1/2500sec but you use a telephoto lens that has a min. aperture number of f/6.5, so you cannot open the aperture further to let more light in. If you leave ISO at 100, you’ll get a heavily under exposed image. Of course, you cannot raise the light in your scene either – you are outdoors, it’s sunny anyway, and flash is no option.

The image will turn out too dark. In this emergency, you have no other choice than raising the gain. That´s what I did in this image.

Photograph of an eagle in flight with raised ISO
1/2500sec | f/6.3 | ISO250

You have to see noise as a compromise. In cases where the light level is low, or you need extremely high shutter speeds, you may have to raise ISO to get the shot. The only other option would be to not take the image at all.

Ads are annoying, right? You surely realized that there are no ads on this page. Help me keep it like that by using my affiliate links (amazon, booking.com,...) - check out the button below.
Wolf Amri Thinking
Wolf Amri
Photography Coach

BUT!!! As you can see from the bird example above: Don’t let anyone tell you, that you have to use ISO100 during the day, or a high ISO for night scenes. The bird was shot at high noon at ISO 250 and the image below in the middle of the night at ISO100.

If you have a tripod at hand, or even just rest the camera on a table or chair, you could just as well raise the exposure time (shutter speed) for a night scene instead of using a higher ISO. Remember, they are interchangeable, so chose ISO according to what is needed for a specific shot, rather than listen to most cheat sheets.

Night shot of city - low ISO
30sec | f/9 | ISO100
Avoid ISO Noise by Adding Light

A second option to avoid ISO noise is to add light to your scene, or in other words raise scene luminance. Too many people forget that photography is all about light.

And that doesn’t have to be complicated or costly. Why shoot noisy images of your dog indoors, if you can add scene luminance by simply going outdoors instead of raising ISO?

dog puppy fast shutter speed
1/1250sec | f/1.4 | ISO100

Other options to add scene luminance are of course the use of flash or speedlights. When done tastefully, this can lead to extraordinary results.

Osei Smith, one of the great moderators in our Facebook photography beginners group has done some outstanding outdoor shots with flash as you can see in this image. Follow him @o.z.photos on Instagram for more eyecandy.

When using flash or speedlights, don’t make the mistake to completely under expose the image and let the flash be the dominant light. In this image, Osei still used a higher ISO to give the background (where the flash doesn’t reach) enough light and a rather slow shutter speed to blend the background in nicely.

add a speedlight to increase scene luminance
1/60sec | f/2.8 | ISO400
COPY TO CLIPBOARD

Copy a link to the page-section below to the clipboard

Note: the following paragraph contains a referral link. If you purchase topaz software from that link, you can get a 15% discount, using the code “wolfamri“. At the same time you will help me improve this website and my free youtube photography course. Just FYI: I would never for the life of me recommend anything that I wouldn’t use and like myself!

How to Remove ISO Noise (For Non-Nerds)

Why for non-nerds? Further down in the advanced ISO knowledge section, I’ll explain techniques used by enthusiasts that require taking several images and stacking them. Here I will explain easier and much faster techniques for everyday use!

1. Noise Reduction While Editing

First and foremost: here is my preferred way of removing ISO noise: Topaz Sharpen AI. It’s a software and believe it or not, you read right. “Topaz Sharpen AI”. There is also a software “Topaz Denoise AI“, both are rather similar despite their names, but I prefer sharpen AI because it does a better job at getting  a perfect balance between sharpness and noise reduction. The result is much better than what you’d get with for example Lightroom. Find a comparison of noise reduction in Lightroom vs Topaz Sharpen AI below.

Talking about Lightroom. Since it is the most widely used software for image editing, it can of course also reduce noise to a certain extent, I have done a video about the best practice: secret trick of removing noise in Lightroom.

Adobe Lightroom Topaz Sharpen Ai

Again, if you like the result above, use their trial version first to see if you like it. If you decide to buy,
get 15% discount using the code “wolfamri“.

2. Long Exposure Noise Reduction

Beside using a lower ISO in general, there is another setting you can use to reduce noise.
For long exposure shots (so images with a long shutter speed) there is a well-known issue called long exposure noise, that will even appear at the lowest ISO setting of your camera. Its characteristic are extremely bright colorful pixels in rather dark areas.

Long exposure noise is read noise caused mainly by the sensor getting hot. Quite logically that happens more in warm or even hot environments, like the image below. For these cases almost all modern cameras offer a setting called “Long Exposure Noise Reduction” that is either automatically enabled, or is optional.

What it does is first shoot the regular image, and then basically shoot another image with a closed shutter. That second image has the same exposure time as the real image to create the same amount of noise. But it is not saved as an image. It is only used to internally compare the two shots and interpolates the noise with neighbouring pixels. The benefit is of course less noise. The downside is that you have to wait for the second image to complete, before you can take the next shot – in my case below, I had to wait another 145sec, which is pretty boring.

bulb setting for long exposure on the beach can create long exposure noise
145sec | f/11 | ISO100

In case you wonder how it was possible to use such a long shutter speed (145sec) at noon: First, I used so-called ND-Filters, which are basically sunglasses for your camera. More on that in a later chapter. And second, I used a cable remote and bulb-mode.

COPY TO CLIPBOARD

Copy a link to the page-section below to the clipboard

The effects of ISO

3. Lower Dynamic Range

A higher ISO will reduce the Dynamic Range of your images. I will explain “why” further down in the advanced knowledge because it is not particularly easy to understand for a beginner. Compared to noise, the reduced dynamic range is not that easily detected in your final images. But that doesn’t mean it’s not important. Let me recommend having a look at the website photonstophotos.net  for charts like this one that will display dynamic range vs ISO for your specific camera.

iso vs dynamic range
© 2012-2021 William J. Claff All Rights Reserved.

Just a quick explanation: Dynamic range is the amount of luminance levels (EV) that can be captured by a sensor in a single image. See 8 stops vs 14 stops in these examples.
Why that is limited and why it is important will be explained if you continue reading, but in general if you raise ISO, your camera will capture less brightness levels than when you leave the ISO at the sensors base level.

8 stops dynamic range
14 stops dynamic range

Here is just a quick example, why a high dynamic range is important. An image with a big dynamic range will capture more brightness levels without quickly losing the details in the very bright and very dark parts – or in other words, it will not clip these areas as quick as an image with a low dynamic range does.

That will not only give you a better image out of camera, but much more important for enthusiastic photographers: it will give you more room to play with when you open the image in your editing software.

Big Dynamic Range Same image edited

advanced ISO knowledge

The nerdy stuff

If you are a photography beginner, skip this section and practice what you have learned so far.
Return, once you feel comfortable to learn more about ISO.

COPY TO CLIPBOARD

Copy a link to the page-section below to the clipboard

What causes ISO Noise?

There are many different kinds of noise but they can be basically classified in two categories: photon noise and read noise. The latter is “more important” in photography because it creates more noise than the other and it’s also the one we can better “control”. So let’s start with that.

1. Read Noise

Read Noise is in fact a collective term for noise with different origins that are created while counting and processing the light particles. Here are a few examples of read noise.

The number of light particles that neighboring pixels count can differ, despite being hit by the same amount.
Let’s say, all these neighboring pixels are hit by 10 light particles. The logical result would be that they all count the same amount of particles – namely 10 – and ideally output the same brightness.

no iso read noise

But due to for example heat issues, electronic interference, different effectiveness of neighboring sensels counting photons,… one sensel makes a mistake and only counts 9 particles. So one pixel will be slightly darker than the others, even though it should have the same brightness. I hope you see the faint difference on your viewing device.

closeup graphic of ISO read noise

Another example for such an error would be a reset failure. Before you take the next shot, the camera has to reset the count of every pixel to zero. But that doesn’t always work reliably. So one pixel might “reset” the count to 5 instead of 0.

If now the same 10 light particles hit every single pixel, that one pixel would start at 5, add the 10 and the result would be 15 instead of 10 that the other pixels counted. That would create a much brighter pixel. So additionally to the above dark pixel, we get a bright pixel. And suddenly we see “noise” at what was supposed to be uniform brightness.

bright and dark pixels due to read noise

Imagine that happening thousands of times in your sensor that has millions of pixels and what was meant to be an exact representation of the light in your scene, suddenly has quite a few  “flaws”. If you don’t add any gain to the light particle count, the brightness difference between these pixels is there, but usually hardly visible.

But adding gain, these differences are duplicated (ISO 200), quadruplicated (ISO 400), octuplicated (ISO 800),….. whateverplicated 🤣. At one time the difference between neighbouring pixels becomes very visible, starts to become annoying and create obvious ISO noise, or scientifically correct: a lower signal to noise ratio (more info below). The signal was the same in both images, but the noise due to the amplification caused by the gain is now much higher.

graphic: more noise after raising iso

Read noise is actually subdivided further, for example into front-end read noise and back-end read noise. A little more on that further down when I talk about ISO invariance.

2. Photon Noise (Shot Noise)

Photon noise is very hard to explain or understand for non-physicists. But I will try to explain it briefly.
Photon noise is “natural noise”. When you photograph a scene, there is never a constant flow of light particles, even if the light doesn’t change. Instead there are tiny fluctuations that are not visible to our human eyes.
Camera sensors however, are much more sensitive in this regard, and they record these fluctuations.

A characteristic of shot noise is, that it’s standard deviation (so the typical dispersion to both sides of the mean) is the square root of that mean value.

  • So if the sensor counts 10.000 photons (a lot of photons – bright scene), the standard deviation would be +/-100, so 9.900 to 10.100 photons, which would be +/-1% in either direction.
  • If the sensor counts 100 photons instead (few photons – dark scene), the standard deviation would be +/-10 – so 90 to 110 photons, which would be 10% in either direction.

10% is quite obviously a much bigger fluctuation than 1% and would therefore create a lot more noise. So dark images or dark areas of images show much more shot noise than bright areas.
Again: without adding gain, these fluctuations are not all that visible. But if you amplify the difference by raising ISO, it will become more and more prominent, just like with the read noise above.

What Does Signal to Noise Ratio Mean?

When diving further into ISO knowledge, you will quickly stumble over the more sophisticated – some will say the scientifically correct – term for ISO noise, “signal to noise ratio“.
In a nutshell, the signal is the expected “perfect original”, which is the incoming light without any fluctuation (photon noise). Noise is any deviation of the expected pure signal, caused by the mentioned fluctuations, camera electronics or other “issues” (read noise).

  • Letting more light onto our sensor by changing the exposure, so adding light or adjusting aperture and shutter speed, will improve the signal side of the ratio.
  • A higher gain (ISO) does not change the signal at all, but will increase the noise part, so decrease the signal to noise ratio.

In other words: If you can use exposure to brighten the image, don’t use gain.

COPY TO CLIPBOARD

Copy a link to the page-section below to the clipboard

Why is ISO noise better visible in dark areas?

For two reasons: first of all, the photon noise is higher in darker areas.
And second: imagine the sensor makes an error counting the photons. It counts one light particle less than actually hit. Quite logically, that one light particle difference will be hardly visible among 1000 light particles, but very visible when the area is supposed to be black. Let me explain:

let’s say in a bright area of your image, the sensor counts 1.000 light particles for a certain pixel. If that pixel is inconsistent and only counts 999 light particles, you will hardly realize at all because the difference will be 0,1%.


graphic comparing a brightness difference of 0,1%

If in a dark part of your image, the sensor only counts 2 light particles for a pixel, and due to an inconsistency, 1 goes missing, the difference will be 50% – so pretty massive.

graphic comparing a brightness difference of 50%

I know these are simplified examples, but they should give you a good understanding why ISO noise affects different parts of your images differently.

Why is ISO noise better visible in uniform areas?

That’s pretty easy to explain: if you are photographing uniform area, two neighboring pixels are supposed to record the same brightness. If hey don’t, you will see the difference pretty quick.

If on the other hand you are shooting a very complex surface like sand in the desert, it will be hard to differentiate noise from the natural brightness difference of neighbouring sand grain.

ISO noise is less visible in areas that are not uniform
COPY TO CLIPBOARD

Copy a link to the page-section below to the clipboard

Why do Bigger Sensors Create Less Noise?

Full frame, or even bigger sensors are usually better in low light than smaller conterparts. Particularly when you compare sensors of the same generation. Sensor tech evolves quickly, so comparing a 10+ year old bigger sensor to a very new smaller sensor might not give you the same result.

But why do bigger sensors have an advantage?
You know that a sensor is counting light particles. Compare the pixels in a sensor to different sized buckets in the rain. Logically, the bigger bucket will collect more rain, than a smaller bucket.
The same happens for bigger pixels. They get hit by more light particles and will therefore count more of them, giving you a bigger signal to noise ratio. So basically, the bigger it is, the more light it can capture.

I could go more into detail on pixel density and pixel pitch, but this might lead too far for this ISO page. Let me know if you would be interested and I’ll add some more info on that topic.

Analogy: bigger water bucket will collect more water

How to Remove Noise (For Nerds)

Besides the more common practices about how to remove ISO noise explained above, there are more sophisticated methods that are particularly used for night sky imaging but could theoretically be used for anything that doesn’t really move.

Dark Frames

Similar to long exposure noise reduction, you can take dark frames to reduce noise. The difference to long exposure noise reduction is, that you will save the dark frames along with the real images and do the noise reduction later in software.

For these dark frames, you need the same exposure time that you used for the real image to get the same sensor temperature, etc. and most important: it has to be really dark, otherwise you cannot use the files. closing the lens cap alone might not do the trick.
Particularly night sky photographers use several dark frames to reduce as much noise as possible.

Stacking

Also for night sky imagery, particularly deep sky images, people stack several (up to hundreds) of images to reduce the noise and raise the clarity of a shot. Here too the magic is done in software and the images are compared to one another and the noise is interpolated.

stacking images to remove ISO noise

Particularly for Milky Way Photography: Star Trackers

For those of you interested in photographing the Milky way: you usually have to raise ISO quite a bit to photograph the milky way. Reason being is, that the earth rotates, so you cannot extend the shutter speed for too long without introducing “star trails”. But if you use a device called Star Tracker, that counteracts the rotation of the earth, you can expose for much longer and therefore reduce the need for a higher ISO dramatically.

ISO Invariance

ISO invariance graph

You learned that ISO is the gain that is added to your images after the image is already exposed. And I told you adding the gain is similar to adjusting brightness in your editing software. It’s similar, but not exactly the same (yet).

Reason being is that there are different kinds of read noise. Some that happen before analogue to digital conversion (A/D conversion) and some that happens after that. I know this sounds very complicated, and it in fact is. One is called front end read noise (before D/A conversion) and one back end read noise (after D/A conversion). Most of the noise is front end read noise, but a bit of it is back end read noise, with the latter getting lower and lower in modern (professional) cameras.

An ISO invariant camera would be completely back-end-noise free. And that would mean that there would be absolutely no difference whether you raise the brightness in your RAW converter, or raise ISO in camera. So it would be exactly the same image whether you shoot ISO800 in camera, or shoot ISO100 and raise the brightness slider to +3 in your RAW converter (keep in mind, that is only valid for RAW files).

The advantages are mind blowing. Imagine raising the brightness for only parts of your images, keeping a much bigger dynamic range in your shots. So you could basically raise the ISO for only the darker parts, but keep it low for the brighter parts. If you raised ISO in camera, it will always be done across the complete image, so it will equally affect the highlights and the shadows.

BUT: what you must not forget: whether you raise ISO in camera or the brightness in Photoshop, both means raising the gain. So if you can raise the brightness with exposure instead, it would always be much better!

Do ISO invariant cameras exist yet?

To some extent, every camera is ISO invariant. See the topic “Hi and Lo ISO settings” below. For these settings, every camera is ISO invariant. Other than that, some modern cameras get really, really close to being ISO invariant, across the complete ISO range, while others are pretty far away. You can check how good your camera is in this regard by visiting dpreview’s awesome ISO comparison tool.

"Hi" and "Lo" ISO settings

Having the option of shooting at ISO 50 can be a big advantage and in most cameras it neither adds noise, nor does it remove dynamic range. It’s just simply halfing the photons measured at ISO 100.

On the other end, the Hi settings are really nothing more than image editing. Just simple digital amplification (after the A/D conversion). You can just as well do that in Lightroom – just with the option of keeping the highlights better under control. So using Hi and Lo is usually not a good idea at all.

ISO and Film

One reason why there is so much confusion about ISO is, that back in the film days, ISO was a part of exposure. There was no digital gain that could have been applied, because there was no digital anything in a film camera.

How come? In a nutshell, the ISO film-speed changes the actual raw film. The light-sensitive parts of a film are super tiny silver halide chrystals. When these are hit by light particles, they start a chemical reaction. That reaction only takes place while the film is hit by light – so during exposure.

With higher ISO films, these chrystals get bigger to gather more light. And them getting bigger, create visible “noise”. But still, that gathering more light only takes place while the film is exposed to the light. As soon as the shutter is closed, the chemical reaction comes to a halt. Still it is all about light, so the exposure triangle should still have been an exposure square back in the days, incorporating scene luminance.

COPY TO CLIPBOARD

Copy a link to the page-section below to the clipboard

Why Does a Higher ISO Reduce Dynamic Range?

To finish, let’s now take a really deep dive into ISO.
The animations above under “how does ISO work?” were pretty simplified. Let’s add another layer of info to them.
I told you what the dynamic range is. It’s the cameras ability to simultaneously capture very low light signals alongside very bright signals in a single image.

Some More Sensor Knowledge

The Full Well Capacity of a Sensel (Pixel)

Every sensel (rememer a sensel is basically a pixel) has a maximum capacity – so a maximum amount of photons it can count for a single image taking process. That capacity is dependent on the camera voltage and the size of the sensel and is called full well capacity.

If the sensel is full, the camera will display that pixel as 100% white.

Over Exposing a Sensel

If after the sensel is full, it is still hit by photons, they cannot be counted any more – the pixel can’t get any brighter than white, so this area of the sensor loses the additional information of these overflowing pixels and will have clipped highlights. If you want to retain these highlights instead, you’d need to take another shot with reduced exposure (by changing aperture or shutter speed).

The Noise Floor

You would assume, that black is the exact opposite to white, so the sensel doesn’t count any photons. But it’s not as easy as that. Due to read noise, the sensel will always “count” photons, even if they are not there. These non-existent, but counted photons create the so-called noise floor. Some cameras will create more read noise and have a higher noise floor, and others will create less. Obviously, a lower noise floor is better.

The Dynamic Range is the Area Between These Two

A cameras dynamic range is the amount of stops it can capture within a single image taking process from that noise floor, to the full well capacity of the sensel. Logically, that is dependent on two things:

  1. How many photons will fit into a sensel, before it is full, because the more photons it can count, the more gradations of brightness levels (stops) it can differentiate.
  2. The height of the noise floor. Because the better the camera can keep noise under control, the more room is left between the noise floor and the full well capacity.

How ISO Affects Dynamic Range

Filling the Well at ISO100

Now let’s imagine we take an image at base ISO, which is ISO100. We set our exposure to make the brightest parts of our images just saturate the brightest sensels to full well capacity. In this case a shutter speed of 1sec. The dynamic range from the noise floor to the full well capacity is pretty large.

Using ISO instead of Exposure to Fill the Well

And now we take the same shot again, but reduce the exposure time to 1/4sec, as a result, the sensel will only count 1/4 of the photons as it did before.

To get the same image brightness, as before, when we filled the well with exposure only, let’s now raise ISO (remember = gain).

Unfortunately, the ISO will not only amplify the signal, but also the noise floor, and quite logically, the dynamic range from the noise floor to the full well capacity is reduced quite a bit. And that’s why a higher ISO will reduce dynamic range.

So again: if you can get an image with the components of exposure,
don’t use the gain!!!

What You Learned:
  • ISO is the gain
  • Only use the gain when you have no other choice
ISO MNEMONIC

ISO is the gain that is applied by the cameras processor
after the image is exposed.

Squeeze every bit out of aperture and shutter speed
before you raise the gain!

ISO FAQ

Here is a list about the most frequently asked questions regarding ISO

Please keep in mind that cameras have different noise levels. The difference can be dramatic. So even if you do everything you can to avoid noise - squeeze every little bit out of exposure to reduce the need of an even higher ISO - some times you need to raise the gain and live with the noise your camera produces.

Maybe you are interested in my video "Low Light Photography - Can You be Bad at High ISO Photography?"

Believe it or not, that depends a lot on your camera. If you own an ISO invariant camera (or close to it), it would be better to raise it later in Lightroom or Photoshop. If you shoot RAW and if you are willing to edit. If you don't shoot RAW, then definitely get it right in camera.

One thing you must never forget though: if you can get the desired image brightness using only the components of exposure (being scene brightness, aperture and shutter speed), you would be better off doing that, rather than either raising the gain in camera or later.

The wrong answer is: when the noise and the lowered dynamic range start to get visible.

The correct answer though is: if you didn't do everything you could to get the same shot without raising the gain. Or in other words: did everything to get the shot adjusting aperture and shutter speed.

ISO is the gain.

If you detect excessive noise because you made a mistake while shooting - or if you dive through your archives of older images and find out that older cameras couldn't cope with high ISO as the newer ones can, the best option in my opinion is to run it through Topaz sharpen AI. This software creates outstanding results that you cannot get within photoshop and lightroom at the time I'm writing this.

The link above is an affiliate link, but I don't want you to think I would ever try to convince you to buy anything. They have a fully functional trial version and I'd encourage you to try before you buy. If you like to buy, use the discount code "wolfamri" for a 15% discount.

Please comment below. I will constantly update this section with new questions.

Do you want to shoot images like these?

These images were all shot by me. My name is Wolf Amri, I’m a professional photographer and film maker.

On my youtube channel, I explain not only exposure, but everything else you need to know about photography. Explaining in a video is much easier than written because I can show you images, animations and examples on the way. So let me recommend watching my youtube beginner photography course.

6 thoughts on “ISO”

  1. Wolf, you’ve done a fantastic job on this, as always, and you’re a great teacher.
    Thank you for spending so much time encouraging us to learn this information to feel more confident with understanding how ISO and Exposure Time work. I prefer the use of, “Exposure Time” much better than “Shutter Speed” and your way of explaining it.

  2. I have to admit being blown away by all of this. ISO is far and away the most technical aspect of compensating for the lack of light. What I think is interesting and will surprise many, is that it’s applied after exposure, as opposed to shutter speed and aperture. I’m reasonably familiar with ISO as gain, and how it functions but I’ve never seen this much “accurate” information in one place. Bravo ! You’ve explained every aspect of this far more effectively than on any photography site I’ve ever seen.

    1. Thank you, Ken. Your comment is really appreciated. ISO is so misunderstood, while in fact, it is the easiest to understand of all the camera settings. It’s just gain. Yet many say it makes the sensor more sensitive to light, increases exposure, and whatnot. Nope – all it is is gain.

Leave a Reply

Your email address will not be published. Required fields are marked *

Login to your account

Email *
Password *